Showing posts with label north/west europe. Show all posts

Sunday, 9 September 2012

brussels sprouts, pancetta & lemon pasta


A few months ago, I met Tia Bicky for lunch and was lucky enough to get a plate of Luxe Bakery’s winter pasta special of shredded brussels sprouts and mandolin-thin slices of broccoli. They were tossed in buttery, lemon moisture and salted by a touch of crisped prosciutto. It was divine, meeting all my salty sour requirements.

I just had to make it at home.


The best part about this dish is that it uses fairly few and quite cheap ingredients, it’s perfect for a wintery lunch or dinner and it easily becomes vegetarian if required.

The brussels sprouts and lemon make a delightful flavour that made me think of a fresh sauerkraut and, if you have a mandolin, by all means add some wafer thin slices of just-blanched broccoli for texture and colour.


Brussels Sprouts, Pancetta & Lemon Pasta

Anna’s very own take on a Luxe special. Serves 4.

Ingredients:

270g shredded brussels sprouts
70g pancetta, chopped
Zest of 1 lemon
Juice of 1 lemon
125ml chicken stock
1 knob of butter, for sauce
1 knob butter, for frying
1 dash olive oil, for frying
Pecorino, for serving
Salt and pepper
Pasta, for serving (I used troifie)

Method:

1. In a frying pan, fry pancetta until browned and just crispy. Set aside.

2. In the same frying pan, heat a little butter and olive oil for frying. When frothing, add shredded Brussels sprouts with salt and pepper. Sauté for 1 minute or so.

3. Add a dash of chicken stock and mix through. This will spread the heat and steam throughout the sprouts and help to soften them. Sauté the sprouts for another 5 minutes.

4. Now they might start to form browned edges and stick to the pan. Add another dash of chicken stock to deglaze and incorporate those browned bits. Cook until the sprouts are soft.

5. Once soft, add the lemon zest and reserved pancetta and heat through.

6. Next add the lemon juice, remaining chicken stock and the chopped up knob of butter, stirring through to create extra juices that will form a sauce around the pasta.

7. When the pasta is ready, toss the sprouts and juice through then topped with freshly ground pepper and grated pecorino cheese.

Note: if you want to make this vegetarian, use vegetable stock and instead of the pancetta consider tossing salty ricotta salata through the pasta before serving.


Sunday, 24 June 2012

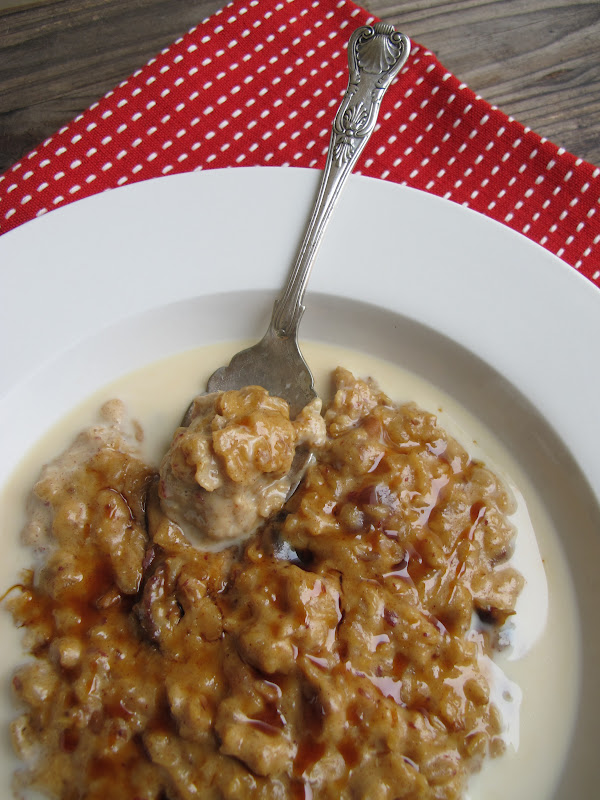
creamy date, oat & quinoa porridge


It’s a wintery Sunday morning, your breath fogging the air above the bed and frost blanketing the window panes. All you want to do is stay in bed, and so you do!

Once you’re up, attired in woolly socks and pajamas that have seen better days, you make your sleepy way into the kitchen for a warm, hearty bowl of porridge.


But why eat plain old oats when you can break your fast on an indulgent combination of cream, chopped dates, luscious date syrup and Tahitian vanilla salt. All brought together with a healthy dose of quinoa flakes.

The result is luxurious and enough to tempt you out of bed, even on the coldest mornings.


Creamy Date, Oat & Quinoa Porridge

Anna’s very own recipe. Serves 3-4.

Ingredients:
1 cup rolled oats
¼ cup quinoa flakes
2 cups milk
½ cup pouring cream
½ cup water
1 teaspoon Tahitian vanilla salt
½ teaspoon ground cinnamon
15 pitted dates, chopped
1 tablespoon date syrup (or brown sugar)
Extra date syrup, to serve (optional)
Extra warmed milk, to serve (optional)

Method:

1. Combine milk, cream, oats, dates, date syrup, cinnamon and salt in a saucepan over a medium heat.

2. Bring just to the boil, then cook, stirring continuously, until mixture is thick and creamy.

3. Drizzle with extra date syrup and top with warm milk to serve.

Saturday, 9 June 2012

baked clarines w garlic


I’m back from the steaming hot cities of Shanghai and Singapore, and happy to be plugged into the chilly Sydney air.

As an Australian, you’d think I’d crave the warm arms of humid tropical locations, but the reality is I find them very hard to handle in business contexts. Dresses clinging to damp skin, feet squelching in high heels, wiping your brow and trying to keep your make up from melting off your face. Not fun, and it’s no doubt worse for men in their suit and ties.

Give me holidays instead: shorts, t-shirts and a glass of cold guava juice. That’s a totally different story. Then I can take it with grace.

The refreshing immersion into Sydney's cold weather calls for hearty fare and a wheel of melted cheese is just the trick. Sit back with a glass of white wine and some salted rosemary cracker shards to dip into the warm, gooey cheese puddle.

A perfect Saturday afternoon homecoming.


Baked Clarines w Garlic

Based on a recipe from Cheese Slices by Will Studd.

Ingredients:
1 x 500g Clarines
3 cloves garlic, sliced
Ground black pepper

Method:

1. Preheat oven to 180’C.

2. Bring cheese to room temperature.

3. Use a knife to poke holes into the top of the cheese

4. Insert garlic cloves into the top of the cheese and bake in oven for 20 minutes.

5. Garnish with black pepper.

Note: original recipe recommends also adding thyme sprigs and ½ cup Pinot Noir before baking. Sounds amazing too!

Saturday, 14 January 2012

pineapple carpaccio w mint sugar


This was the dish that completely converted me to fresh mint.

Who would have thought that beautiful, verdant mint would colour sugar so perfectly.

All you have to do is smash the fresh mint with the sugar crystals and you’re left with this crumbly, vibrant topping that lasts for a few days.

I sprinkle it on anything I can, and I’m guessing you will too.

It's a perfect match to the pineapple, but now I'm wondering what other herb sugars would go equally well with slabs of juicy pineapple. Let me know if you test another out!


Pineapple Carpaccio w Mint Sugar

Recipe by Jamie Oliver. Serves 4.

Ingredients:
1 ripe pineapple
4 heaped tablespoons caster sugar
1 handful of fresh mint

Method:

1. Cut both ends off and peel the skin with a knife, removing any little black bits.

2. Then cut the pineapple into quarters and remove the slightly less tasty core (if you have a pineapple as juicy as mine the core is soft and delicious so I ate that too!).

3. Finely slice your quarters, lengthways, as thin as you can.

4. Lay out flat in one or two layers on a large plate. Don't refrigerate this – just put it to one side.

5. Pick the mint leaves and add them to the sugar in a mortar and pestle then bash the hell out of it. You'll see the sugar change colour and it will smell fantastic. It normally takes about a minute to do if you've got a good wrist action.

6. Sprinkle the mint sugar over the plate of pineapple – making sure you don't let anyone nick any pineapple before you sprinkle the sugar over.


Pineapples supplied by the team at King of Fruit

Tuesday, 11 October 2011

sorrel & goats cheese egg bake


This recipe is basically a savoury custard flavoured with sorrel, an interesting leafy vegetable often found as a wild weed.

As a child my mother taught me to identify sorrel in the wild and I used to eat it when playing in fields or out on walks. I love the sour flavour.


These days, I suppose I’m more risk adverse and less likely to start chomping on random weeds in case I identified it incorrectly or someone has sprayed them with pesticides.

If you have sorrel growing as a weed in your garden, I encourage you not to kill it but to harvest it. It’s great in a salad, makes a wonderful soup (hot or chilled) and pairs perfectly with goats cheese in this wonderful breakfast dish.


Sorrel & Goats Cheese Egg Bake

Anna’s very own recipe. Serves 4.

Ingredients:
8 eggs, beaten
500g sorrel, roughly chopped
3 garlic cloves, grated
Juice & zest of 1 lemon
125g sour cream
100g soft goats cheese, crumbed
⅓ cup parmesan
Salt and pepper, freshly milled to taste

Method:
1. Preheat oven to 180’C. Grease 4 x 250ml (1 cup) ramekins.
2. Pick over sorrel and remove any tough stems from the larger leaves.
3. In a food processor, blend eggs, garlic, lemon juice and zest.
4. Add sour cream and blend again. Season to taste.
5. Add sorrel and pulse until it’s chopped through, but not completely pureed into oblivion.
6. Pour into grease ramekins, dot with crumbled goats cheese.
7. Sprinkle with parmesan.
8. Bake in oven for 30 minutes or until completely set on top and risen. Eat hot.


This sorrel recipe is my contribution to Weekend Herb Blogging, this week hosted by Cinzia from Cindystar. I don’t participate in WHB all that often anymore, but every time I do it seems to be Cinzia’s turn to host!

Saturday, 10 September 2011

earl grey & rhubarb jam


This is one of the best jams I’ve made in a while.

The sweet-sour flavour of the rhubarb goes so well with the aromatic bergamot in Earl Grey. The jam is a perfect balance of rhubarb flavour and the hint of Earl Grey at the end.

I am so happy with the results and long to devour it heaped upon warm scones and clouds of clotted cream. With a cup of Earl Grey, of course!

Earl Grey & Rhubarb Jam

Anna's very own recipe. Makes 2 x 250ml jars.

Ingredients:
2 tablespoons Earl Grey tea leaves
1 cup water
350g rhubarb
350g sugar
15g Jamsetta (optional)
1 lime, juiced

Method:

1. Chop the rhubarb into small pieces.

2. Boil the water and pour it over the tea leaves. Leave to steep for about 15 minutes.

3. Strain the tea into a large saucepan and bring to boil.

4. Add the rhubarb and lime juice, cover and stew until the rhubarb has softened (no more than 5 minutes).

5. Add sugar and jamsetta, stirring until dissolved.

6. Bring to the boil and allow jam to bubble away for 5-10 minutes until it reaches setting point.

7. Pour into sterilised jars and seal.

Note: to check setting stage, drop a small amount of jam onto a chilled saucer for 30 seconds, run finger through the mixture and if it wrinkles or remains separated it has reached its setting poin.


Monday, 15 August 2011

stinging nettle & ricotta gnudi


Gnudi are so-called, because they are the filling of a raviolo, without the pasta encasing it. They are, in effect, “nude”.

This recipe is simple and quite elegant. Small ricotta dumplings, flavoured with vitamin-rich nettles, floating in simple chicken broth: it’s absolutely delicious and soul-satisfying.

Using high quality ingredients in this recipe is critical because there’s not much done to each element to disguise inferior quality. Excellent chicken stock, parmesan and ricotta will make all the difference.

You must wear gloves when handling the nettles because getting stung is a nasty experience. Be sure to wash them thoroughly from any grit or potential pesticides.

Blanch them in boiling water for 30 seconds, then drain them and refresh under cold water. Wash them again to remove any remaining dirt.

You can use your hands at this point because once they’re blanched, although the barbs still look nasty, they’re soft and sting-free. I promise.


Gnudi all'Ortica con Brodo
(Nettle & Ricotta Dumplings in Broth)


Anna’s very own recipe. Serves 4 as a starter.

Ingredients:

200g blanched stinging nettles
200g ricotta
1 egg
3 garlic cloves, crushed
2 garlic cloves, grated finely
1 tablespoon wholemeal flour, for binding
1 litre vegetable stock
Zest and juice of a lemon
1 tablespoon fresh parsley, finely chopped
100g parmesan, finely grated
Piece of parmesan rind
Olive oil, for cooking
Salt and pepper, to taste

Method:

1. After blanching nettles in boiling water for 30 seconds, make sure to squeeze firmly them to remove excess moisture.

2. Heat a little olive oil in a frying pan, add crushed garlic cloves and nettles, salt and pepper and sauté until garlic has softened.

3. In a food processor, blend garlic and nettle mixture with ricotta and egg.

4. Remove and mix in half the parmesan to form a dough (reserve remainder for serving). If it’s too sticky, add a little of the wholemeal flour to bind.

5. Take a teaspoon of mixture and roll into small balls. Set on tray and refrigerate until ready to cook.

6. In one saucepan, bring a lot of salted water to the boil (for cooking gnudi).

7. Meanwhile in another saucepan, bring the chicken stock, parmesan rind and lemon zest to the boil. Reduce to simmer.

8. To cook the gnudi, gently drop them into the boiling water. Cook until they rise to the surface (between 1-3 minutes). Remove with slotted spoon and rest on tray, keeping warm.

9. When gnudi are ready, taste broth for seasoning then discard parmesan rind.

10. Add lemon juice to taste, then ladle into bowls. Add warm gnudi and sprinkle with parsley and parmesan before serving.

Note: If you can’t find nettles, use spinach instead.


This is my contribution to Weekend Herb Blogging, this week hosted by Chris from Mele Cotte.

Wednesday, 10 August 2011

apple cake w rhubarb & cream cheese glaze


This is the most wonderful apple cake recipe I have ever eaten.

The outside is crunchy, like a fine crust, while the inside is crumbly and moist with chunks of apples and the heady fragrance of cinnamon.

I defy anyone not to like this cake.

The inspiration for this cake came after a visit to the local markets at Eveleigh, where an eccentrically dressed farmer (think Mongolian fur hat and worn leather vest) forced us to taste his Pink Lady apples. He was pushing them on us like a dealer to a junkie, so we begrudgingly accepted a slice and quickly skulked away.

When the sweet-tart fruit hit our lips, we truly became addicted.


Our eyes widened and we looked at each other in shock, as if we’d never truly eaten an apple before. That farmer knew what he was doing, and in a flash Jonas and I had bought ourselves a heavy bag full of luscious Pink Lady apples.

Now we just had to figure out what to do with them all.

There was Roasted Apple Sauce and Chorizo w Apples and we ate the rest just as nature made them.

But the crowning glory was this cake.

Initially I bought rhubarb to make an apple and rhubarb pie but, when I remembered Steph’s Earl Grey Cake with Rhubarb Cream Cheese Glaze, I decided I wanted to nick her frosting idea and smother it all over an apple cake.

A quick search on Google Images to find a cake with the right fluffy interior, and I stumbled across this recipe. Done.

Baking this cake was dead easy and the results were superb. I took the leftovers to work and it was certainly a crowd pleaser at morning tea.

Better still, it was exactly the kind of cake that Jonas loves, and it’s always nice to make him happy.


Apple & Cinnamon Cake

Recipe by Selma Horan via Taryn Cox, The Wife. Serves 12.

Ingredients:
2 eggs
2 cups of sugar
1 cup of canola oil
2 teaspoons of vanilla
2 teaspoons of cinnamon
1 teaspoon baking soda
½ teaspoon salt
3 cups flour
3 cups chopped apples

Method:

1. Preheat oven to 180’c.

2. Beat eggs in mixing bowl.

3. Add sugar, oil and vanilla.

4. In a separate bowl combine cinnamon, baking soda, salt and flour.

5. Slowly add the flour mixture into the wet ingredients until dough has formed.

6. Add chopped apples to dough (if you dont have a kitchen-aid mixture with a dough hook, then it is best to mix in apples by hand as dough becomes very thick.)

7. Pour into a lightly greased bundt cake pan and cook for 45 – 60 minutes.


Rhubarb & Cream Cheese Glaze

Recipe by Steph from Raspberri Cupcakes. Makes plenty.

Ingredients:
150g rhubarb, diced
Zest of 1 lemon
2 tablespoons caster sugar
1 tablespoon water
125g cream cheese, softened
1 cup (150g) icing sugar, sifted

Method:

1. Place rhubarb in a small saucepan on low heat with lemon zest, sugar and water.

2. Stirring occasionally, simmer rhubarb until soft and cooked through, about 10 minutes.

3. Remove from the heat and set aside to cool.

4. Puree mixture in a food processor or blender.

5. Place cream cheese in a large mixing bowl and beat until smooth.


6. Add sifted icing sugar and rhubarb puree and beat until smooth.

7. Pour over the top of cooled cake and serve immediately.

Saturday, 30 July 2011

crispy brussels sprouts w bacon & garlic


This was the recipe I used to convince Jonas that brussels sprouts are delicious, eaten with pan-fried duck.

Apart from being ridiculously cheap and oh-so-pretty (have you seen the way they grow!), brussels sprouts are very healthy too. If you like to eat them, you’re one of the luckiest people in the world.

Photo source:
www.secretseedsociety.com
Until recently, Jonas and I were not those people.

We wanted to like brussels sprouts, but every time we tasted them we’d screw up our noses and look at each other in disappointment.

Back in late 2010, Jonas and I ate a tremendously earthly lentil and crispy brussels sprouts dish at Porteño and suddenly I knew there was hope for us.

Jonas was yet to be convinced. It’s one thing to eat brussels sprouts prepared by a professional chef, it’s another to try and develop the taste for them at home.

But then we made this.

The brussels sprouts are given a go-around in a frying pan to ensure they’re crispy and flavoursome, while garlic and bacon add an extra, convincing oomph.

And, as Jonas has started to say almost weekly, “everything tastes better with bacon”.


Crispy Brussels Sprouts w Bacon & Garlic

Anna’s very own recipe. Serves 2.

Ingredients:
10 small brussels sprouts
2 bacon rashers, minced
2 garlic cloves, thinly sliced
¼ cup (60ml) olive oil
2 tablespoons rock salt, sea salt or "Kosher" salt
Salt and pepper

Method:

1. Peel off any bad leaves from the brussels sprouts

2. Bring a pot of water to the boil. Add rock salt.

3. Blanch brussels sprouts for 4 minutes then drain and refresh in cold running water.

4. Cut sprouts in half lengthwise.

5. Heat olive oil on high. Add bacon and cook 1 minute.

6. Add Brussels sprouts and fry until they start to brown around the edges and the bacon crisps.

7. Add garlic slices and fry 1 minute until softened.

8. Drain brussels sprouts to remove excess oil. Serve hot.

Wednesday, 27 July 2011

marzipan & grand marnier truffles


Soft almond paste flavoured with orange zest and a burst of orange liqueur, smothered in dark chocolates. Yummy.

And just what I need, because I’ve had a rough week.

Jonas and I came home from a wonderful weekend in hinterland of the Sunshine Coast, where we celebrated Ms Correct and B-Rad’s tres chic wedding (if you are ever in that part of the world, I highly recommend spending some time in the cute mountain village of Montville: it’s just lovely).

When we came home our houseguest / adopted son, Fabio, had left us a note saying he’d run away with the circus.

So the house was all ours again.

I was keen to do some cooking, write some posts and begin the painful, tedious job of reloading all my old images to the blog after I’d accidentally deleted THEM ALL a few weeks ago. Don’t ask.

But then I caught the flu. Not some common floozy cold but nasty Madame Influenza herself.
That progressed into a chest infection and here I am, six days later, only just crawling out of bed and still decked out in head to toe fleece.

Jonas has turned out to be a regular little Florence Nightingale, bolstering my health with delicious dinners and a regular supply of chocolate and mandarins, a craving of my current state.

He loves marzipan, and so this little truffle recipe is a shout-out to my lovely hubby who nursed me back to health.

Another 2011 Food Challenge, to make more candies, ticked off.


Marzipan & Grand Marnier Truffles

Anna's very own recipe. Makes 6-10 truffles.

Ingredients:
100g marzipan
1 teaspoon orange zest
1 tablespoon Grand Marnier
100g dark chocolate

Method:
1. Knead marzipan, orange zest and Grand Marnier together.
2. Roll into balls then refrigerate for an hour or so to harden up.
3. Melt the chocolate then allow it to cool for 5-10 minutes (depends how warm your kitchen is).
4. Roll the balls in the chocolate then allow them to cool further for 20 minutes before refrigerating them.
5. Remove from fridge just before eating.

Tuesday, 19 July 2011

fisherman's rouille


There’s something romantic about any dish that’s described as a fisherman’s meal, and this is what drew me towards this cuttlefish and potato salad, which I cooked as part of Murdoch Book's 365 Challenge to cook every recipe from Stéphane Reynaud's 365 Good Reasons to Sit Down to Eat.

Rouille is from the Carmargue area, in the south of France, and gets its name from its colour: rouille = rust.

The seafood was perfectly tender and the honey-sweet saffron was so flavoursome in the garlic-laden mayonnaise. Overall, a wonderful little side dish for a lunch on a warm afternoon.


Fisherman’s Rouille

Recipe from 365 Good Reasons to Sit Down to Eat by Stéphane Reynaud. Serves 6.

Ingredients:
1kg cuttlefish hoods or octopus, cleaned
3 onions
200ml olive oil
700ml white wine
800g potatoes
3 garlic cloves
1 egg yolk
1 tablespoon mustard
150ml sunflower oil
Salt and pepper
1 pinch saffron threads

Method:
1. Cut the cuttlefish into wide strips.
2. Peel and slice the onions.
3. Sauté the onions with a little olive oil in a flameproof casserole dish
4. Add the cuttlefish and moisten with white wine.
5. Cook, covered, over a low heat for 1 hour then uncover to allow the wine to completely evaporate
6. Peel the potatoes, cut them in large cubes cook them for 15 minutes in boiling water.
7. Peel and chop the garlic, combine it with the egg yolk and mustard, add the sunflower oil to make a mayonnaise
8. Season then add the saffron threads.
9. Combine the potatoes and cuttlefish. Dress with the garlic mayonnaise in the dish.
10. No more vampires!


Here's a cute little extract from the book:

Garlic is a great friend of cooking but a great enemy of the mouth. It permeates the body like a colony of ants in a packet of sugar – you breathe it, you sweat it and it clings to your skin.


What can I do, I hear you say, so that the pleasure of the palate doesn’t turn you into a walking garlic clove?


1) Find a special friend who, like you, adores garlic, good conversation, maybe even more . . . it could become a true tale of Marseille, putainnn con!
2) Stop eating it. Unbearable.
3) Remove the digestible sprout inside, eat a coffe bean ro cardamom pod to offset some of the odours.
4) Stop talking for six hours, what’s more, that’ll give us a break!


Sunday, 10 July 2011

caramelised fig baked custards


At a PR event for the Game Farm at Bitton Gourmet, I was discussing with Helen from Grab Your Fork as to why Asians (both Aussies and the original gangsters) love a good old crème brûlée. I’m not a big fan myself, but Helen theorised it’s the eggs and the creaminess that attracts the Asian palate.

Good theory. Makes sense.

Let’s go with it.

On cue, some petit four size crème brûlées appeared, and so we both tucked in.
In the words of Rachel Zoe, I die.

This tiny cup of creamy goodness undid the last 10 minutes of my blathering and protestations about how dull and pointless crème brûlée is.

This crème brûlée was magnifique!

With David Bitton’s cookbook in my goodie bag (merci!) I was determined to recreate this baked custard treasure at home, only I wanted to do something with dried figs.

For some people, the joy of the crème brûlée is the silky custard texture so adding figs would ruin the entire experience. If you are that person, do not read on.

If you are not sure, you might consider straining the custard after you purée the figs through, but I think that would be a waste of delicious fig.


Fig seeds have such a nutty, crispy texture to them and this baked custard can handle that. It’s strong and gutsy. It’s brave.

I used the Bitton cookbook as a guide on technique but used my own measurements and ingredients to create this sweet baked custard.

I’m pretty proud of the results, and rate this as one of my best inventions ever.

I’ll let you judge for yourselves.


Caramelised Fig Baked Custards

Anna’s very own recipe. Serves 4.

Ingredients:

Figs:
50g brown sugar
60ml dark rum
2 cinnamon quills
8 dried figs, stalk removed & quartered
60ml water

Custard:
3 egg yolks
50g brown sugar
200ml cream
100ml milk

Method:
1. First prepare the figs by melting the sugar in a small saucepan over a low heat. Be careful not to let it burn.

2. Next add the cinnamon quills and rum, allowing the alcohol to sizzle off. The sugar will seize and harden, but don’t worry about it.

3. Next add the water and figs and cover the saucepan. Bring to boil then reduce to simmer for 4 minutes.

4. Ensure the figs have softened and all the toffee pieces have dissolved, creating a thick syrup. Remove from heat and set aside.

5. Preheat oven to 180’C.

6. In a large bowl, beat egg yolks and brown sugar until pale and creamy.

7. In a large saucepan, put cinnamon quills from the fig mixture (don’t worry if they bring some fig over with them), milk and cream.

8. Heat mixture almost to boiling point then strain into egg mixture, whisking rapidly the whole time to prevent eggs from scrambling. Discard quills.

9. Return to saucepan and heat on medium, stirring continuously until mixture thickens into custard.

10. In a blender, purée half the fig pieces (reserving syrup) and all the custard.

11. Pour into four 200ml ramekins. Place ramekins in a baking dish, lined with a tea towel (to prevent bases from overcooking) then pour boiling water halfway up the sides of the ramekins.

12. Bake in oven for 40 minutes. You may wish to start checking a little earlier, depending on your oven, but the custards will be ready when set and an insert knife or skewer comes out pretty clean.

13. Either chill for 2 hours or serve warm. Top with remaining fig pieces and rum syrup.

Sunday, 8 May 2011

braised purple heirloom carrots


These carrots were braised with white wine, garlic, thyme and chicken stock.

It was, simply put, quite delicious.


The gorgeous colour of the carrots added oompf to the visuals of meal and I’m sure there’s something marvelously healthy about all that purple pigment. Antioxidants or some such bafflegab.

Interestingly, the carrots leach their colour out so it looked like I'd used red wine. I didn't. Just plain old white wine. 

The flavours are intense of carrot, herbs and a touch of wine and as you can imagine this dish tasted beautiful alongside Grilled Goat Cutlets & Rhubarb Agrodolce Sauce.


Wine-Braised Purple Heirloom Carrots

Anna's very own recipe. Serves 4-6.

Ingredients:
700g heirloom carrots, sliced
1 teaspoon fresh thyme leaves, picked over
3 garlic cloves, thinly sliced
1 cup (250ml) white wine
¾ cup (190ml) chicken or vegetable stock
Freshly milled salt and pepper, to taste
1 tablespoon butter (optional)

Method:

1. Preheat oven to 180’C.

2. In an oven proof pot, heat the olive oil then add carrots, garlic and thyme.

3. Add salt and pepper to taste then stir, frying until garlic softens (around 5 minutes).

4. Add wine, then bring to a boil. Cook off alcohol for around 2 minutes.

5. Add stock, bring to a boil.

6. Cover pot, place in oven and braise until carrots have softened but still have some texture (around 10-20 minutes).

7. If you're not vegan, this is the point you add butter for a little extra richness. Stir to melt and combine. Serve dish hot.

Note: some people place a piece of baking paper on top of the carrots when they’re in the oven to retain moisture. I didn’t, but everyone’s ovens are different so use your judgement.


These beautiful heirloom carrots are my contribution to Weekend Herb Blogging, this week hosted by Astrid at Paulchen's Foodblog. Be sure to visit her blog for the round-up.


Related Posts with Thumbnails