Sunday, 7 October 2012

sockerkaka - swedish sponge cake


Sockerkaka translates to “sugar cake”, but really it’s a type of sponge cake without all the fuss.

Today is my darling husband’s birthday and he requested I made him a sponge cake sandwiching strawberry jam and cream – for breakfast!

How could I say no?


Last weekend we bought almost 2kgs of strawberries for $9 and he’d asked me to turn them into jam, since strawberry is his favourite jam.

I’m glad I did, because nothing beats a sponge flavoured with homemade jam (see recipe below).

Although the recipe is very simple (and you can make it more so if you use 200ml milk and 100g butter instead of cream and buttermilk), the results are light, sweet and the perfect sponge substitute.


Sockerkaka (Swedish Sponge Cake)

Based on a recipe from www.sockerkaka.com. Serves 10-12.

Ingredients:
400ml (4dl) sugar
4 eggs
60g butter
125ml cream
125ml buttermilk
2 vanilla pods (or 2 teaspoons vanilla bean paste)
2 teaspoons lemon zest, finely grated
600ml (6dl) flour
4 teaspoons baking powder
For filling/decoration
200ml cream, whipped
60ml (¼ cup) strawberry jam, slightly warmed  (see recipe below)
Strawberries
1 tablespoon icing sugar

Method:

1. Preheat oven to 175’C. Grease and line 2 x 20cm round baking tins.

2. Scrape out seeds from vanilla pods.

3. Melt butter with buttermilk, cream, lemon zest and vanilla pods and seeds. Remove from heat once butter is melted. Set aside.

4. In a new bowl, beat eggs and sugar on high speed until light, fluffy and doubled in size (at least 5 minutes).

5. After removing vanilla pods, beat milk mixture into the egg mixture.

6. In another bowl, combine the flour and baking powder.

7. Gently fold dry ingredients into wet ingredients until just combined.

8. Divide between tins and bake in oven for 35 minutes or until an inserted skewer comes out clean.

9. Cool 5 minutes in tin, then turn out onto cooling rack. Cool completely.

10. To assemble cake, spread the strawberry jam on top of one cake, the spread over the whipped cream. Gently place the other cake on top then dust with icing sugar. Finish with strawberries.

Note: you can use 200ml milk and 100g butter if you don’t want to use cream and buttermilk. If you slightly warm the jam is goes a bit runny and soaks into the cake. But make sure it's not hot or it will melt the whipped cream.


Strawberry jam is quite difficult to get right because strawberries have little to no natural pectin and therefore making a jam that sets can be hard and takes longer than other fruits. I know I have trouble.

There are plenty of websites that offer fantastic advice on how to rescue jam that hasn’t set, even after you’ve put it in jars, so don’t let fear put you off trying. Besides, even if you end up with runny jam, it’s still going to taste amazing.


Strawberry Balsamic Jam
Anna’s very own recipe. Makes 6 x 250ml jars.

Ingredients:
1.5 kg strawberries, washed and hulled
1kg caster sugar
300g raw sugar
50g jamsetta
100ml balsamic vinegar

Method:
1. Place a small saucer in the freezer. You’ll use this to test the jam.

2. Heat strawberries in a large pot with vinegar for about 5 minutes, stirring to release juices and prevent burning.

3. Meanwhile, warm sugar on a tray in the oven for around 5 minutes, being sure not to burn or dissolve it.

4. Add warm sugar and jamsetta to fruit purée, then heat and stir until sugar fully dissolves.

5. Bring to a gentle boil for 10 to 20 minutes, stirring every now and then to prevent burning.

6. To test the set of the jam, remove the saucer from the freezer and teaspoon on a little jam. Wait 30 seconds then run your finger through. If it crinkles and leaves a path, then the jam is ready. Otherwise continue cooking.

7. When ready, remove from heat and pour hot jam into sterilised jars. Seal immediately.


Sunday, 23 September 2012

shopsin's pumpkin pancakes


These days I wake up very early and incredibly hungry. Instead of launching myself out of bed I take my trusty smart phone and flick through Facebook, Instagram and Twitter to see what I missed out on while I slept.

This morning I discovered three exciting things from Facebook:
1) one of my favourite work colleagues got engaged yesterday afternoon
2) Jonas’ beautiful cousin Camilla (also a food blogger!) married her equally wonderful boyfriend in a surprise wedding in Stockholm!!!
3) These super delicious pancakes, posted by Saveur

Since I couldn’t do much to celebrate the first two items, I decided to get up and make pancakes to celebrate all the love and happiness some of my favourite people must be feeling right now, and to spread some of that love to my husband.


I wondered whether the pancakes would be a bit gimmicky, but they were amazing. Not too sweet, full of spicy oomph and subtle pumpkin flavour, and tiny flakes of salt that hit your tongue every now and then. They were hot, fluffy little pancakes and I will definitely make these again.

After reading over the Saveur website, and the reviews by people who had made these already at home, I decided to make a cranberry and maple sauce to go alongside it. They’d even go well with maple-sweetened mascarpone or cream cheese.


Shopsin's Pumpkin Pancakes w Cranberry-Maple Syrup

Recipe by Chef Kenny Shopsin from Shopsin’s in New York City’s Essex Street Market. Makes 12 pancakes.

Ingredients:
Pumpkin Pancakes
1 cup plain flour
¾ cup wholemeal flour
3 tablespoons brown sugar
1 tablespoon ground cinnamon
2 teaspoons baking powder
1 teaspoon ground cloves
1 teaspoon ground ginger
½ teaspoon salt flakes
¼ teaspoon ground allspice
1 cup canned pumpkin purée
1 cup heavy cream
1 cup milk
2 eggs, lightly beaten
6 tablespoons canola oil, for frying
Butter, for serving
Cranberry-Maple Syrup
¼ cup dried cranberries
1 cup maple syrup

Method:

1. In a bowl, sift together flours, cinnamon, baking powder, cloves, ginger, salt, and allspice.

2. In another bowl, whisk together the pumpkin purée, brown sugar, cream, milk, and eggs.

3. Combine with flour and spice and whisk until smooth.

4. Heat 1 tablespoon oil in a non-stick skillet over medium-high heat.

5. Using a ¼ cup measuring cup, pour batter into skillet to make three 3" pancakes.

6. Cook until bubbles begin to form on the edges, 1–2 minutes. Flip and cook until done, 1–2 minutes more.

7. Repeat with remaining oil and pancake batter and keep cooked pancakes warm in the oven.

8. Meanwhile, in a small saucepan, bring maple syrup and dried cranberries to the boil until foaming, then remove from heat. The dried cranberries should plump up in the warm syrup.

9. Serve pancakes hot with butter and cranberry syrup.

Note: the original recipe uses only plain flour, regular sugar and ½ cup milk.

Sunday, 9 September 2012

brussels sprouts, pancetta & lemon pasta


A few months ago, I met Tia Bicky for lunch and was lucky enough to get a plate of Luxe Bakery’s winter pasta special of shredded brussels sprouts and mandolin-thin slices of broccoli. They were tossed in buttery, lemon moisture and salted by a touch of crisped prosciutto. It was divine, meeting all my salty sour requirements.

I just had to make it at home.


The best part about this dish is that it uses fairly few and quite cheap ingredients, it’s perfect for a wintery lunch or dinner and it easily becomes vegetarian if required.

The brussels sprouts and lemon make a delightful flavour that made me think of a fresh sauerkraut and, if you have a mandolin, by all means add some wafer thin slices of just-blanched broccoli for texture and colour.


Brussels Sprouts, Pancetta & Lemon Pasta

Anna’s very own take on a Luxe special. Serves 4.

Ingredients:

270g shredded brussels sprouts
70g pancetta, chopped
Zest of 1 lemon
Juice of 1 lemon
125ml chicken stock
1 knob of butter, for sauce
1 knob butter, for frying
1 dash olive oil, for frying
Pecorino, for serving
Salt and pepper
Pasta, for serving (I used troifie)

Method:

1. In a frying pan, fry pancetta until browned and just crispy. Set aside.

2. In the same frying pan, heat a little butter and olive oil for frying. When frothing, add shredded Brussels sprouts with salt and pepper. Sauté for 1 minute or so.

3. Add a dash of chicken stock and mix through. This will spread the heat and steam throughout the sprouts and help to soften them. Sauté the sprouts for another 5 minutes.

4. Now they might start to form browned edges and stick to the pan. Add another dash of chicken stock to deglaze and incorporate those browned bits. Cook until the sprouts are soft.

5. Once soft, add the lemon zest and reserved pancetta and heat through.

6. Next add the lemon juice, remaining chicken stock and the chopped up knob of butter, stirring through to create extra juices that will form a sauce around the pasta.

7. When the pasta is ready, toss the sprouts and juice through then topped with freshly ground pepper and grated pecorino cheese.

Note: if you want to make this vegetarian, use vegetable stock and instead of the pancetta consider tossing salty ricotta salata through the pasta before serving.


Wednesday, 29 August 2012

milo cupcakes w condensed milk icing


I love Raspberri Cupcakes. It’s a colourful, whimsical blog that reminds me of falling down the rabbit hole and ending up in Wonderland.

Steph, the author, is brilliant. Such a young woman so dedicated to experimenting with her favourite sweet flavours and achieving perfection. It’s beyond impressive.

I think most of her creations have made it onto my Pinterest account. And who can blame me with offerings like Pretzel and M&M Chocolate Cheesecake, Shamrock Macarons with Baileys Chocolate Ganache, Popcorn Fudge, Balsamic Toffee Strawberries and the spectacular Purple Ombre Sprinkles Cake.


One of the things I love about her blog is that she experiments with Australian candies and cookies, including my all time milk flavouring, Milo.

Milo is a malted chocolate powder and it is wonderful. Amazing. Life changing even.

This recipe of Steph’s was great. The maltiness came through in the cake and the frosting was decadently sweet and almost caramel from the addition of condensed milk. Heaven.


Milo Cupcakes w Condensed Milk Icing

Steph’s brilliant recipe. Makes 10-12 cupcakes.

Ingredients:

Cake
200g plain flour
200g caster sugar
1 tsp baking powder
1/2 tsp bicarb soda
100g Milo (add more to taste)
1 tsp vanilla extract
180g sour cream
170g unsalted butter, softened
2 large eggs

Icing
150g slightly salted butter (or unsalted + a pinch of salt), softened
300g icing sugar, sifted
5 tbsp sweetened condensed milk

Method:

1. Preheat oven to 180’C. Grease or fill cupcake tray with liners.

2. Sift flour, bicarb and baking powder in a bowl and set aside.

3. Cream butter and sugar with an electric mixer in a large mixing bowl and then beat in eggs one at a time until combine.

4. Add sour cream, vanilla and milo and beat until just combined.

5. Add flour mixture and beat on low until just combined.

6. Fill cupcake liners until 3/4 full and bake for approx 15-20 mins or a skewer inserted into the centre of a cupcake comes out clean. For the best texture, the cakes should be dark golden brown on top and firm to the touch and after cooling for 1 minute out of the oven.

7. Cool on a wire rack.

8. To make the icing, remove butter from the fridge 30 mins ahead of time.

9. Beat butter until light and fluffy and then beat in icing sugar until combined.

10. Add sweetened condensed milk and beat until combined.

11. Pipe or spoon over the top of cupcakes when they are cooled and drizzle some extra condensed milk over the top. Finish with a sprinkle of Milo.

Note: Can be stored in an airtight container in the fridge overnight.


Sunday, 19 August 2012

snapper ceviche - ceviche de pargo


 Ceviche de Pargo

Ceviche is a dish I often crave because it combines some of my favourites things: sour citrus, spicy chilli and seafood.

It hails from the coastal countries of Central and South America with the Peruvians claiming to be the originators, spreading the word from their busy port-town of Lima. There’s also evidence that ancient Peruvians (Incans) made similar dishes from fermented liquors prior to the arrival of Europeans, who brought with them the precious citrus.

Polynesians also have their own ceviche, often including coconut milk, which seemed to evolve independently of the South Americans.


To make ceviche, I prefer to use firm white fleshed fish like snapper, swordfish or ling. If that’s not your thing, you can always use tuna, salmon or ocean trout.

Just make sure you use the freshest fish possible. Ask your fishmonger for very fresh fish (tell them what you're using it for) and make the ceviche on the same day you buy it.

Many recipes call for leaving the fish in the lime juice for hours, but I think this makes the fish quite tough. To ensure the fish is firm but still soft under your teeth, don’t “cook” it in the lime juice for any more than an hour.

The milky liquor that the fish has marinated in is called leche de tigre (tiger milk) or leche de pantera (panther milk) and in Peru it’s drunk in shot glasses as an appetiser. It’s rumoured to be a natural Viagra. I’m a bit sceptical about that claim, but it certainly tastes good so don’t throw it away.


Ceviche de Pargo (Snapper Ceviche)

Anna’s very own recipe. Serves 4 as a small starter.


Ingredients:
300g snapper fillets, deboned
½ cup of fresh lime juice (about 3 large juicy limes)
½ small red onion, finely diced
1 tomato, deseeded & chopped into small pieces
1 small jalapeño chilli, finely sliced

To serve:
Chifles (plantain chips) or tostados (tortilla chips)
Fresh coriander, chopped
Fresh jalapeño chilli, sliced
Avocado, sliced
Salt and pepper, to taste

Method:

1. Cube the fish into 3cm pieces.

2. In a non-reactive dish (plastic or ceramic), mix the raw fish pieces with the lime juice, jalapeño, red onion and tomato pieces.

3. Ensure all the fish is covered in lime juice and refrigerate for up to one hour before serving.

4. At this point you can either drain away the liquid to serve separately, or just keep them together.

5. Serve with fresh coriander, slices of avocado and jalapeño chillies.


Sunday, 29 July 2012

apple-cucumber pickles: a taste of yellow


I was really sad to hear that Barbara of Winos and Foodies had lost her battle with cancer.

She was such a lovely lady and I had the pleasure to finally meet her face-to-face last November at the Australian food bloggers conference: Eat Drink Blog.

Barbara’s one wish was to eat a piece of her 87th birthday cake, but unfortunately she passed away before she made the date. This sad wish very much reminds me of losing my mum.


After being diagnosed with a brain tumour, two surgeries, radiotherapy and chemotherapy didn’t seem to help and although we wouldn’t admit it, we both knew she wouldn’t win this battle.

One day, cuddled up in bed with a cup of tea, I said “You won’t ever get to meet my children, and you won’t be at my wedding, but promise you’ll make my 21st birthday.” She swore she would.

She kept her promise. When the clocked ticked over midnight to mark my birthday, I whispered to her that she had kept her promise and, at 4am on my 21st birthday, she passed away.

That was eleven years ago and not a day goes by that I don’t think of her and shed quiet tears.


To commemorate Barbara, and our loved ones who have had cancer, bloggers are taking part in the Taste of Yellow Monthly Mingle, hosted by London-based South African, Jeanne from Cooksister.

This event requires us to make something yellow, combing Barbara's LiveStrong with a Taste of Yellow event (a yellow themed cooking event that took place on LiveStrong Day) and the Monthly Mingle event by Meeta from What’s For Lunch Honey?

I used to participate in Meeta’s Monthly Mingle quite a lot, but life just seems to get in the way of blogging these days (if you hadn’t already noticed the big gaps between my posts). I should put more effort in again, as cooking and sharing my recipes is one of the things I truly love to do. It’s an artistic expression that I value in my life and I shouldn’t let work and other mundane matters prevent me from pursuing this.

Barbara has reminded me, again, that you should focus on what you love because life is too short and unpredictable not too.


I discovered these quirky heirloom cucumbers at my local farmers market back during Sydney’s summer, so it’s a recipe I’ve had up my sleeve for some time, waiting for the right moment to post it.

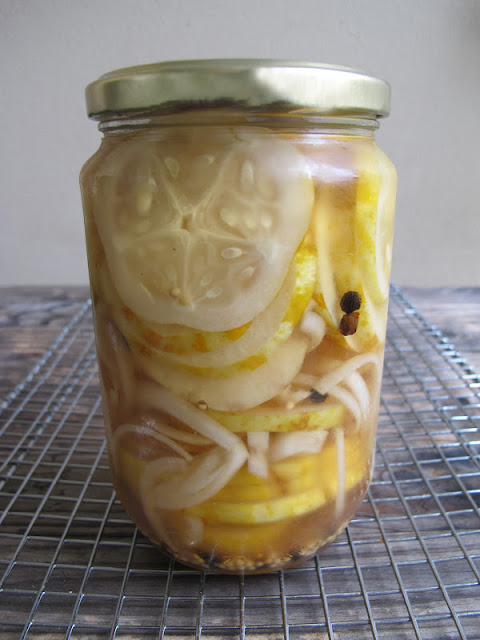
Apple cucumbers, as you can see, are round, yellow skinned types with creamy white flesh. They are very crisp and juicy, perfect for pickling, but their skin is a little tough so slice thinly.

Cucumbers are more than 95% water and are technically a fruit, with most of the flavour in the seeds. Apparently they’re one of the oldest veggies in the world, having been cultivated for thousands of years in Asia.


Heirloom Apple-Cucumber Pickles

Anna’s very own recipe.

Ingredients:
4 apple-cucumbers, sliced
1 shallot, sliced
¾ cup apple cider vinegar
¼ cup water
1 teaspoon salt
2 tablespoons sugar
1 tablespoon black pepper
1 tablespoon yellow mustard seeds

Method:

1. Stuff the cucumber into a sterilised preserving jar.

2. Combine all the other ingredients in a saucepan.

3. Bring to the boil and simmer for 30 seconds to release the flavours of the spices.

4. Pour the boiling liquid over the cucumber, then seal the jar.

5. Cool to room temperature then refrigerate for 24 hours before serving.

Note: Keeps up to 2 weeks. Serve with smoked salmon, on hamburgers and sandwiches or in salads.

Sunday, 15 July 2012

pounti: auvergne pork & prune meatloaf


Some time ago I read about “pounti” or “picoücel” a special pork, prune and bacon cake from the Auvergne region of France. It uses the famous prunes of the region and is served either cold or fried in slabs.

Ever since I read about this pork cake, I dreamt of coming up with my own meatloaf inspired by those flavours, and in fact made it one of my 2012 Food Challenges to come up with a meatloaf recipe.


Ta daaaa!

The results were pleasing. The prunes and sage matched perfectly with the sweet-salty pork meat.

It’s quite a rich meal, so I recommend serving with a refreshing side, such as watercress dressed in olive oil and lemon juice.


Auvergne Pork & Prune Meatloaf (Pounti)

Anna’s very own recipe. Serves 4.

Ingredients:
5 rashers bacon, finely diced
1 onion, finely diced
5 garlic cloves, crushed
500g pork mince
1 cup fresh breadcrumbs (see notes)
200g prunes, pitted & halved
2 tablespoons sage, finely chopped
1 egg, beaten lightly

Method:

1. Preheat the oven to 180’C.

2. Cook the bacon in a dry frying pan until crispy. Set aside to cool.

3. Using the fat from the bacon, sauté the onion, garlic and sage until soft. Set aside to cool.

4. In a bowl, combine all the ingredients together by hand, using your fingers to knead the mixture together into a meat dough.

5. Place in a baking loaf and bake in the oven for around 1 hour or until the meat is cooked through the juices run clear.

6. Remove from oven and allow it to rest for 10-15 minutes before cutting in and eating.

Note: put one torn, fresh bread roll in a food processor and blitz until it turns into fluffy crumbs. Don’t process for too long or the heat of the machine may make the bread damp.

Friday, 6 July 2012

brown sugar meringue w verjuice figs & honey-cinnamon yoghurt


These are divine. The outside are perfectly crisp and break with a pop under your fork, yet the inside is a fluffy, sticky, gooey texture almost like a melted marshmallow.

And the flavour! You can certainly taste those perfect burnt, dark toffee sugars.


I first tried brown sugar meringues at a wonderful slow food wine dinner at Mumu Grill in Crows Nest, and although I have yet to venture across the Harbour Bridge to the far northern shores of Sydney, to dine at this restaurant again, the wonderful meal is branded into my food memory, especially the “brown sugar pavlova”.

This is one of my 2012 Food Challenges, to recreate recipes I had experienced at restaurants and boy does this recipe tick all the boxes.

It was a while ago since I ate the Mumu Grill version, but accompanied with the verjuice figs and the sourness of yoghurt, I might even bravely claim that my version is better.


Brown Sugar Meringue w Verjuice Figs & Honey-Cinnamon Yoghurt

Anna’s very own recipe. Serves 6.

Ingredients:
3 egg whites, at room temperature
100g dark brown sugar
50g caster sugar
Pinch of Tahitian vanilla salt
½ cup pomegranate seeds
125ml thick low fat Greek yoghurt
1 tablespoon honey
½ teaspoon cinnamon
18 dried figs
⅓ cup verjuice
⅓ cup caster sugar, extra

Method:

1. Preheat the oven to 120°C.

2. In a mixing bowl, beat the egg whites until soft peaks form.

3. In another bowl, combine the sugars and salt and stir thoroughly.

4. Beat in the sugar mixture in 1 tablespoon batches, making sure each amount is incorporated before adding more.

5. Beat until the meringue is thick and glossy, holding its shape (peaks).

6. Spoon meringue into six small mounds, leaving space for them to spread and using spoon to create peaked tops.

7. Bake in the centre of the oven for 60 minutes, then prop open oven door slightly and leave to cool for one hour before removing. Cool one more hour before serving.

8. Meanwhile, prepare the figs by heating the verjuice and ⅓ cup caster sugar until boiling. Add figs then bring to the boil and cook for another 3 minutes. Remove from heat and allow figs to cool in syrup.

9. Make the yoghurt by mixing with the honey and cinnamon, then return it to the fridge.

10. To prepare the dish, take a meringue then dollop the honey-cinnamon yoghurt around it. Top with figs and pomegranate seeds.

Sunday, 1 July 2012

smoked apple & chestnut ravioli w cinnamon apple butter


Back in 2007, a few days after our wedding, Jonas and I visited Rockpool, back in it's original iteration when it was one of Sydney's finest, and ordered their extensive degustation menu with premium matching wines. It still stands as the most expensive meal of my entire life, and with the same money we could have bought an overseas airfare and possibly accommodation. Don’t ask, suffice to say it was expensive.

But the memory was also priceless, as it was our wedding gift to each other and many of the dishes we ate on that evening have remained with us.

One in particular was an apple and chestnut ravioli, a dish served to Jonas in his vegetarian days. It was a confusion of sweet and savoury apple and cinnamon and herbs. A clever combination that was executed perfectly.

This year, as one of my 2012 Food Challenges, I decided I needed to recreate recipes I had experienced at restaurants. This was one of them, but I decided to put my own twist on it by using smoked apples, that I hot smoked myself in my Nipper Kipper smoker.


While it was a somewhat complicated recipe (a lot of steps to go through), I feel really rewarded for my efforts.

It was a very elegant dish and would be a big hit at a swanky dinner party.

Unfortunately for me, every shop I visited was out of wonton wrappers so when I finely found some they were square rather than round. Please go with the round versions, they will be much prettier.

And be sure to top your dishes with fresh herbs. They really cut through the intensity of the rich glaze sauce.

I used butter and chicken stock, but you could easily make this a vegetarian version with veggie stock or a vegan version with olive oil instead of butter and go with non-egg-based pasta.

Any leftover ravioli filling can be set in the fridge and eaten as a vegetarian paté.


Smoked Apple & Chestnut Ravioli w Cinnamon Apple Butter

Anna’s very own recipe. Serves 4.

Ingredients:

Smoked apples
2 green apples
Smoker
Wood chips

Ravioli
32 round egg wonton wrappers (for 16 ravioli)
2 tablespoons chopped sage
1 tablespoon butter
1 teaspoon smoked salt
½ white onion, chopped
1 garlic clove, chopped
1 teaspoon freshly milled black pepper
1½ smoked apple, chopped
100g chestnut purée
Butter for frying
Beaten egg, for sealing wonton wrappers

Butter Sauce
50g butter
1 teaspoon onion powder
½ teaspoon ground cinnamon
¼ cup verjuice
Sprig of lemon thyme, picked over
½ smoked apple, chopped
½ cup chicken consommé
¼ cup boiling water
1 teaspoon sugar
Black pepper
Salt
Fresh sage leaves, small and picked over

Method:

For the smoked apples

1. I peeled mine but left the core in.

2. Then I sprinkled about a tablespoon of dampened apple wood dust over some aluminium foil, placed my rack above it, then placed the two apples in and shut the top.

3. With the mentholated spirits lit, I removed the apples after about 20 minutes. This was probably about 5-10 minutes of heating up and 5-10 minutes of pure smoking.

4. When I removed them, they were warm, still fairly white and the outside was mildly soft but the inside was still hard.

5. I didn’t want to cook them any more than this as the smoke flavour would become overwhelming and somewhat acrid, ruining the balance of the dish.

6. Core each apple and chop into cubes: 1½ apples will go into the ravioli and ½ an apple will go into the sauce.


For the sauce

1. In a pan, heat the butter, onion powder, ground cinnamon, black pepper and salt until butter starts to brown and bubble.

2. Add verjuice and lemon thyme and bring to the boil.

3. Add apple, sugar, chicken consommé and boiling water, then bring to the boil and reduce for 5 minutes.

4. The sauce is done when the apple is soft and the liquid has reduced to a dark brown glaze (about ½ cup).

5. Keep warm while you cook the ravioli.


For the ravioli

1. Using a little butter, sauté onion and garlic until soft. Set aside.

2. Heating a little extra butter, add the sage leaves and heat until almost crispy. Set aside.

3. Using the sage-scented butter, add the chopped apples, smoked salt and pepper and fry until the apple is browned and soft.

4. Put the chestnut purée, cooked apple, onion and sage into the food processor and blend into a purée.

5. Line a tray or plastic container with baking paper, for the ravioli.

6. Lay wonton wrappers out on flat surface and brush with beaten egg (egg wash).

7. Put small dollops of purée on half the wrappers, then top them with the remaining wrappers, being sure the gently press out any air pockets when sealing them.

8. Lay the finished ravioli on the baking tray, with paper baking between layers to prevent sticking. Refrigerate for 5 minutes (to firm) or until ready to cook.

9. Bring a pot of salted water to the boil, then simmer ravioli until it rises to the surface and the pasta is cooked through.

10. Drain onto paper towels then plate, drizzling with sauce and apples, sage and thyme leaves.


Sunday, 24 June 2012

creamy date, oat & quinoa porridge


It’s a wintery Sunday morning, your breath fogging the air above the bed and frost blanketing the window panes. All you want to do is stay in bed, and so you do!

Once you’re up, attired in woolly socks and pajamas that have seen better days, you make your sleepy way into the kitchen for a warm, hearty bowl of porridge.


But why eat plain old oats when you can break your fast on an indulgent combination of cream, chopped dates, luscious date syrup and Tahitian vanilla salt. All brought together with a healthy dose of quinoa flakes.

The result is luxurious and enough to tempt you out of bed, even on the coldest mornings.


Creamy Date, Oat & Quinoa Porridge

Anna’s very own recipe. Serves 3-4.

Ingredients:
1 cup rolled oats
¼ cup quinoa flakes
2 cups milk
½ cup pouring cream
½ cup water
1 teaspoon Tahitian vanilla salt
½ teaspoon ground cinnamon
15 pitted dates, chopped
1 tablespoon date syrup (or brown sugar)
Extra date syrup, to serve (optional)
Extra warmed milk, to serve (optional)

Method:

1. Combine milk, cream, oats, dates, date syrup, cinnamon and salt in a saucepan over a medium heat.

2. Bring just to the boil, then cook, stirring continuously, until mixture is thick and creamy.

3. Drizzle with extra date syrup and top with warm milk to serve.

Saturday, 9 June 2012

baked clarines w garlic


I’m back from the steaming hot cities of Shanghai and Singapore, and happy to be plugged into the chilly Sydney air.

As an Australian, you’d think I’d crave the warm arms of humid tropical locations, but the reality is I find them very hard to handle in business contexts. Dresses clinging to damp skin, feet squelching in high heels, wiping your brow and trying to keep your make up from melting off your face. Not fun, and it’s no doubt worse for men in their suit and ties.

Give me holidays instead: shorts, t-shirts and a glass of cold guava juice. That’s a totally different story. Then I can take it with grace.

The refreshing immersion into Sydney's cold weather calls for hearty fare and a wheel of melted cheese is just the trick. Sit back with a glass of white wine and some salted rosemary cracker shards to dip into the warm, gooey cheese puddle.

A perfect Saturday afternoon homecoming.


Baked Clarines w Garlic

Based on a recipe from Cheese Slices by Will Studd.

Ingredients:
1 x 500g Clarines
3 cloves garlic, sliced
Ground black pepper

Method:

1. Preheat oven to 180’C.

2. Bring cheese to room temperature.

3. Use a knife to poke holes into the top of the cheese

4. Insert garlic cloves into the top of the cheese and bake in oven for 20 minutes.

5. Garnish with black pepper.

Note: original recipe recommends also adding thyme sprigs and ½ cup Pinot Noir before baking. Sounds amazing too!

Related Posts with Thumbnails