Showing posts with label weekend herb blogging. Show all posts

Wednesday, 14 September 2011

grilled avocado w melted cheese & hot sauce


Snacks are wonderful. Even better when they’re quick and easy to make.

This is my lazy fall back dinner. It’s made from four ingredients and couldn’t be easier to throw together.

Assemble, grill, eat.

After a long day at work, when all you want to do is crash on the sofa and watch TV, this is the kind of comfort food I turn to: quick and delicious.


Grilled Avocado w Melted Cheese & Hot Sauce

Anna's very own recipe. Serves 1 as a snack.

Ingredients:
1 avocado
1 tablespoon chipotle sauce (Tabasco or Louisiana)
1 tablespoon lime juice
¼ cup parmesan cheese
Salt and pepper

Method:

1. Slice the avocado in half and remove the stone. Prick all over with a fork, or cut criss-cross patterns with a knife. This allows the sauce to penetrate the flesh.

2. Pour the sauce over each half, then top with lime juice and salt and pepper.

3. In the cavity where the stone has been, put a fourth of the cheese on each avocado half. Place under the hot grill for 2 minutes.

4. Top with remaining cheese and grill (broil for Americans!) for another 2 minutes until completely melted and avocado warmed through.

Eat hot with a wedge of lime and chipotle sauce on the side!


Avocadoes are wonderful fruits, which is why I've chosen them as my theme ingredient for WHB in 2007 (cold avocado soup from the Ivory Coast), 2008 (avocado shake from Vietnam) and 2009 (prawn salad from Mexico).

The word avocado comes from the Aztec (Nahuatl) word ahuacatl, via Spanish aguacate and means “testicle”. Perhaps because of its appearance, the Aztecs believed avocadoes were an aphrodisiac and called it "the fertility fruit". Apparently during avocado harvesting, virgins were kept indoors to prevent any promiscuity taking place.

This reputation stuck with the avocado for such a long time and many people in South America wouldn’t eat it because they wanted to appear wholesome. Companies had to undertake serious PR campaigns to dispel the myths and get the fruit out to the public.

The Nahuatl word ahuacatl makes up other words like ahuacamolli, meaning "avocado soup/sauce” which the Spanish transformed into guacamole.

Propagation by seed takes around 5 years to produce fruit and the quality is never as good as the parent tree. Commercial plantations therefore graft new seedlings.

Avocadoes mature on the tree but ripen once harvested. The fruit is high monounsaturated fat contents and contains 60% more potassium than bananas, vitamin Bs, vitamin E, vitamin K and folate.

It is also interesting to note that avocado foliage, skin and pits are said to poison animals such as birds, cats, dogs, cattle, goats, rabbits and fish.

Good for us, bad for Fido.

This WHB is hosted by Graziana from Erbe in Cucina (Cooking with Herbs).


Sunday, 8 May 2011

braised purple heirloom carrots


These carrots were braised with white wine, garlic, thyme and chicken stock.

It was, simply put, quite delicious.


The gorgeous colour of the carrots added oompf to the visuals of meal and I’m sure there’s something marvelously healthy about all that purple pigment. Antioxidants or some such bafflegab.

Interestingly, the carrots leach their colour out so it looked like I'd used red wine. I didn't. Just plain old white wine. 

The flavours are intense of carrot, herbs and a touch of wine and as you can imagine this dish tasted beautiful alongside Grilled Goat Cutlets & Rhubarb Agrodolce Sauce.


Wine-Braised Purple Heirloom Carrots

Anna's very own recipe. Serves 4-6.

Ingredients:
700g heirloom carrots, sliced
1 teaspoon fresh thyme leaves, picked over
3 garlic cloves, thinly sliced
1 cup (250ml) white wine
¾ cup (190ml) chicken or vegetable stock
Freshly milled salt and pepper, to taste
1 tablespoon butter (optional)

Method:

1. Preheat oven to 180’C.

2. In an oven proof pot, heat the olive oil then add carrots, garlic and thyme.

3. Add salt and pepper to taste then stir, frying until garlic softens (around 5 minutes).

4. Add wine, then bring to a boil. Cook off alcohol for around 2 minutes.

5. Add stock, bring to a boil.

6. Cover pot, place in oven and braise until carrots have softened but still have some texture (around 10-20 minutes).

7. If you're not vegan, this is the point you add butter for a little extra richness. Stir to melt and combine. Serve dish hot.

Note: some people place a piece of baking paper on top of the carrots when they’re in the oven to retain moisture. I didn’t, but everyone’s ovens are different so use your judgement.


These beautiful heirloom carrots are my contribution to Weekend Herb Blogging, this week hosted by Astrid at Paulchen's Foodblog. Be sure to visit her blog for the round-up.


Sunday, 27 February 2011

persian pomegranate soup


Ash-e Anār

I first heard of this Persian soup when a friend gave me the gorgeously designed 2006 Marsha Mehran novel called Pomegranate Soup.

Despite my lukewarm response to the book, I had an overwhelming urge to slurp down this sour, tangy soup rich with Middle Eastern flavours and aromas.

When I finally made it, I wasn’t disappointed. The pomegranates give it a sour, earthy flavour and the lamb adds intensity and richness.

This type of Iranian stew is thick and hearty with chunky ingredients. I highly recommend it.


Persian Pomegranate Soup (Ash-e Anar)

Anna’s adaptation of various bloggers' recipes. Serves 4.

Ingredients:
1kg lamb, diced
2 onions, thinly diced
6 garlic cloves
½ cup yellow split peas
1 teaspoon salt
1 tablespoon Aleppo pepper
1 tablespoon ground turmeric
1 cinnamon stick
½ teaspoon ground black pepper
4 cups (1 litre) beef stock
2 cups (500ml) water
½ cup parsley & coriander tender stems, very finely chopped
¼ cup fresh mint, chopped
1 small beetroot, peeled & diced finely
¼ cup basmati rice
2 cups pomegranate juice*
¼ cup pomegranate molasses
1 cup green scallions, chopped
½ cup fresh coriander, chopped
½ cup fresh parsley, chopped
1 tablespoon lemon zest
2 tablespoons pomegranate seeds for garnish
1 tablespoon fresh coriander, chopped for garnish
1 tablespoon parsley, chopped for garnish
1 tablespoon fresh mint, chopped for garnish

Method:
1. In a large pot, brown the lamb in batches and then set aside,

2. Next add in the onion and garlic cloves and cook until tender.

3. Add in split peas, salt, black pepper, turmeric, cinnamon stick and Aleppo pepper and stir for a minute.

4. Add stock and 2 cups water. Bring to the boil then reduce heat. Cover and simmer for 20 minutes.

5. Stir in rice, mint, parsley and coriander stems and beetroot. Simmer, partially covered, for another 20 minutes.

6. Add the lamb and its juices, the pomegranate juice and pomegranate molasses. Simmer for 10 minutes.

7. Taste soup to balance out sweet and sour. Add more pomegranate juice (or lemon juice) to increase acidity or a little sugar for sweetness.

8. Add scallions (green parts), coriander, parsley and lemon zest and simmer for another 5 minutes until herbs have wilted slightly.

9. Ladle soup into serving bowls then garnish with pomegranate seeds and fresh herbs.

Note: *I managed to get around 2 cups from 3 very large and juicy pomegranates.


This recipe, with pomegranate as the theme ingredient, is my contribution to Weekend Herb Blogging hosted by Simona from Briciole.

Sunday, 16 January 2011

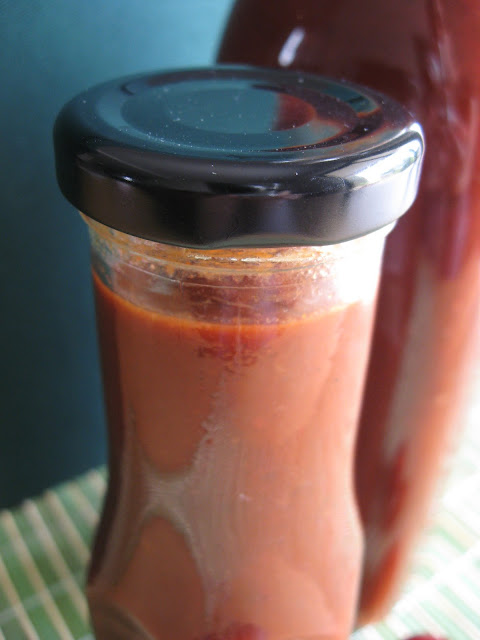
cherry & chipotle barbecue sauce

(Final) Day 7 of Seven Days of Cherries!

Once upon a time, no one in Australia had any idea what a chipotle was. I was lucky enough to have an American father who introduced them to me in my youth, as well as some Mexican pals who reminded me about these wonderful little gems and even showed me where to buy some (from the shop across the street from my house!!!).

These days chipotles are fast becoming a trendy item in Aussie restaurants, part of a resurgence in North American dishes and a new interest in Latin American cooking.

Chipotles, as I am sure I’ve blogged many times before, are smoked jalapeño chillies. They are spicy but they are also incredibly smoky and sweet, and are perfect for flavouring sauces.

Personally I love chipotles en adobo, which means they come in a can of sauce typically made from tomato, paprika, onions, vinegar, garlic, bay leaves and oregano. The chillies are already reconstituted and don’t need to be soaked back into softness, and the sauce has made them a little sour.

This sauce was very easy to make, even if it does contain loads of ingredients. You could cut out or add your own bits and pieces. Basically this is a sauce made from whatever is in the fridge and cupboard. The important part to remember is balancing the sweet and the acidity, so you end up with an even flavour.

I gave a bottle of this to my father for Christmas and kept a smaller bottle for my husband. It’s perfect for sticky ribs, barbecued meat and toasted sandwiches.


Cherry & Chipotle Barbecue Sauce

Anna’s very own recipe. Makes approx. 1 litre.

Ingredients:
1kg (2.2 lbs) cherries
1 white onion, finely chopped

3 garlic cloves, finely chopped
2 chipotle chillies in adobo, finely chopped
Olive oil, for cooking

2 teaspoons ground coriander
2 teaspoons ground cumin
1 tablespoon paprika
¼ cup tomato paste

800g (1.8lbs) canned crushed tomatoes
¼ cup ketchup
¼ cup kecap manis (thick, sweet soy sauce)
2 tablespoons maple syrup
1 tablespoon brown sugar

2 tablespoons Worcestershire sauce
1 tablespoon HP sauce
2 tablespoons apple cider vinegar
1 tablespoon balsamic vinegar

Method:

1. Pit and chop cherries.

2. Heat olive oil and sauté onion until softened but not brown.

3. Add garlic and chipotle chillies and fry until soft too.

4. Next add the paprika, ground cumin and ground coriander and stir through.

5. Add the tomato paste and fry until thickened.

6. Add the remaining ingredients (cherries, canned tomatoes, ketchup, kecap manis, maple syrup, brown sugar, Worcestershire sauce, HP sauce, apple cider vinegar and balsamic vinegar).

7. Stir well and then simmer down for 20 minutes until reduced slightly and thickened. Taste to ensure sweetness and acidity is well balanced.

8. Blend into a puree in a processor or blender. While still hot, poor into glass bottles and seal.


This is my last cherry post after seven days of pure cherry recipes:
Cherry, Feta & Oregano Salad
Cherry Almond Shake
Pickled Cherries
Cherry & Vanilla Jam
Cherry Vinegar
Cherries in Amaretto Syrup
Cherry & Chipotle Barbecue Sauce

With my theme ingredient being cherries (of course!) this is also my contribution to Weekend Herb Blogging hosted by Cinzia from Cindystar.

Tuesday, 4 January 2011

goat cutlets w rhubarb agrodolce sauce


When Jonas started eating meat I was determined to have him experience all the various cuts and types of meat possible.

After a lovely morning stroll to the farmers markets at Eveleigh Carriageworks, I got chatting with one of the stall operators selling goat meat, and this inspired me to make these wonderful marinated cutlets and sweet-sour sauce.

It was all part of my three course rhubarb feast that included a raw rhubarb & feta salad as well as a rhubarb, strawberry & vanilla compote with chocolate custard.

Goat is a very strong flavoured meat, even more so than lamb. In cutlet form, it’s very easy to overcook and serve tough, so the trick is to serve it on the pink side.
As goat meat is so strong, it’s perfect to pair with gutsy marinades and powerful sauces because the flavours really shine through.

This agrodolce sauce is my own concoction, based on Italian sweet and sour principles. It worked perfectly with the goat but could be equally matched with a lamb or pork dish for the less adventurous meat eater.


Grilled Goat Cutlets w Rhubarb Agrodolce Sauce

Anna’s very own recipe. Serves 4.

Ingredients:
Fresh thyme flowers, picked over for garnish
Olive oil, for cooking

Marinade

8 goat cutlets (or 12 if very small)
½ cup red wine
1 tablespoon thyme leaves, picked over
1 teaspoon freshly ground black pepper
4 garlic cloves, crushed

Sauce

1 red onion, finely diced
4 garlic cloves, finely sliced
4 stalks of rhubarb, chopped
2 tablespoons red wine
2 tablespoons brown sugar
2 tablespoons cabernet verjuice
½ cup water
Salt and pepper, to taste

Method:
1. Marinate goat overnight in red wine and garlic.

2. Next make the agrodolce sauce. Heat olive oil, and on a low heat cook the onion and garlic until soft and translucent.

3. Add the rhubarb and brown sugar and continue cooking until some of the moisture has been cooked out.

4. Add the red wine and cook until some of the alcohol has evaporated.

5. Add the water and verjuice and simmer until rhubarb is soft. Cool, then process into a rough purée.

6. Return to saucepan and reheat. Taste sauce, season and ensure a good sweet-sour balance (adjust as required adding more verjuice or brown sugar). Keep warm.

7. To cook goat cutlets, grill until medium-rare, basting with marinade throughout cooking.

8. Serve cutlets hot with agrodolce sauce.


This recipe (using thyme & rhubarb) is my contribution to Weekend Herb Blogging, this week hosted by Haalo from Cook (almost) Anything At Least Once.

Friday, 10 September 2010

passionfruit marshmallow hearts


I remember the first time I realised marshmallows don’t have to come in a package but could be made, fresh, at home.

And after Jonas and I experienced the most exquisite passionfruit marshmallows at Rockpool, I put it on my to-do list with awe but never dared attempt it myself.

So this year I made it one of my 2010 Food Challenges to make sure I stopped living in fear.
The big day came for my friend’s hens night and I pulled them off.

Soft and pillowy, tangy with tropical passionfruit and then topped with 70% dark chocolate.

Delicious!

Passionfruit Marshmallows

Recipe by Rockpool via Australian Gourmet Traveller. Makes 50 squares.

Ingredients:
180ml strained passionfruit juice (about 10 passionfruit)
20g powdered gelatine
500g caster sugar
2 eggwhites
Snow sugar, for dusting

Method:

1. Lightly grease and line a 17.5cm x 25cm shallow cake pan and dust base liberally with snow sugar.

2. Combine passionfruit juice and gelatine in a bowl and set aside.

3. Combine caster sugar and 1 cup water in a saucepan and cook over low heat, stirring, until sugar dissolves, then increase heat to medium and cook for 5-10 minutes or until syrup reaches 125’C on a sugar thermometer.

4. Remove from heat, add passionfruit mixture to syrup and stir until gelatine dissolves.

5. Meanwhile, using an electric mixer, whisk eggwhites and a pinch of salt until frothy.

6. Gradually add passionfruit mixture, whisking continuously on medium speed until mixture has doubled in size, then slowly decrease speed and mix until mixture is warm (about 40’C).

7. Pour into prepared cake pan, and, using a lightly oiled spatula, spread evenly, then dust top liberally with snow sugar. Stand at room temperature for 3 hours or until firm.

8. Using a sharp knife, cut marshmallow into 2.5cm squares and roll in snow sugar to coat. Store in an airtight container between sheets of baking paper at room temperature for up to 2 weeks.

Note: to make heart shapes I used an oiled cookie cutter and all the leftover bits and pieces were turned into rocky road.


I remember the first time I realised marshmallows don’t have to come in a package but could be made, fresh, at home.

I put it on my to-do list with awe but never dared attempt it.

So this year I made it one of my 2010 Food Challenges to make sure I stopped living in fear.

The big day came for my friend’s hens night and I pulled them off. Soft and pillowy, tangy with tropical passionfruit and then topped with 70% dark chocolate.

Delicious!

And if you want to try your own marshmallows, how about some of these:
Cherry
Chocolate
Cinnamon
Lemon
Orange Blossom
Peanut Butter & Jelly
Peppermint
Raspberry
Root Beer
Strawberry
Ube
Violet

These marshmallows are my contribution to Weekend Herb Blogging with passionfruit as my theme ingredient. If you want to learn more about passionfruits I wrote a post about them back when I blogged this passionfruit curd.

Our host this week is Graziana from Erbe in Cucina (Cooking with Herbs). Be sure to visit for the round-up.


Wednesday, 1 September 2010

chicken w sumac, za’atar & lemon (m’sakhan)


How does a recipe for Palestinian M’sakhan, a London restaurant, an Aussie blogger, a birthday present and Barcelona all come together into one story?

Because my wonderful pal , Nicki, gave me this cookbook from the London restaurant Ottolenghi for my birthday when we celebrated together in Barcelona!

This birthday I gained an extremely unwanted year, forcibly prodding me into a new decade, something I was not at all pleased about.

Despite this anxiety-ridden turn of events, I managed to celebrate the hideous day with some of my closest friends and my sisters in Barcelona.

Who can complain about that?

Well, I still cried a little but when I blew the candles out.
It’s my party and I’ll cry if I want to, right?

But seriously, what are the chances that so many of your peeps can be on the other side of the world at the same time to meet you in one of Europe’s party cities? It was amazing!

And with my June birthday now a distant memory, last weekend I spent my time busily leafing through the Ottolenghi cookbook, marking out the most beautiful recipes.

There are so many that have caught my eye, but I want to share these particularly exciting options with you:
• Cucumber & Poppy Seed Salad
• Puy Lentils, Sour Cherries, Bacon & Gorgonzola
• Jerusalem Artichoke & Rocket Soup
• Lamb & Beef Meatballs Baked in Tahini
• Roast Pork Belly w Gooseberry, Ginger & Elderflower Relish
• Seared Tuna w Pistachio Crust & Papaya Salsa
• Cheddar & Caraway Cheese Straws
• Lavender & Honey Teacakes
• Plum, Marzipan & Cinnamon Muffins
• Prune & Brandy Truffles

But my cookbook will be used first to make this adaptation of the Palestinian Roast Chicken with Sumac, Za’atar & Lemon (M’sakhan).

As the Ottolenghi crew explain, it’s great served with a garlicky-yoghurt sauce with lemon and warm pita bread. I also made an Ottolenghi salad of Radish, Broad Beans & Green Tahini to go on the side.

The results? DELICIOUS!


Palestinian Roast Chicken w Sumac, Za’atar & Lemon (M’sakhan)

Anna’s adaptation from Ottolenghi: The Cookbook. Serves 2.

Ingredients:
2 chicken marylands
Red onion, finely sliced
4 garlic cloves, crushed
1 teaspoons ground cinnamon
1 teaspoon smoky paprika
¼ teaspoon allspice
2 tablespoons sumac
1 lemon
200ml chicken stock
1 teaspoon smoked sea salt
1 teaspoon freshly milled black pepper
2 tablespoons za’atar
50g pine nuts
20g butter
2 tablespoons chopped flat-leaf parsley

Method:

1. Wash then juice the lemon, then cut the juiced fruit into slices.

2. In a large bowl, mix the chicken with the onions, garlic, lemon juices and slices, cinnamon, smoky paprika, allspice, sumac, salt and pepper. Marinate overnight or at least a few hours.

3. Preheat oven to 200’C.

4. Put the chicken and all its marinade in a baking dish, ensuring the chicken is flat and not touching each other. Put the chicken skin side up.

5. Sprinkle the za’atar over the chicken and onions then roast for 30 – 40 minutes until the chicken is coloured and just cooked through.

6. In the meantime, melt the butter in a frying pan and sauté the nuts with a pinch of salt until golden, stirring constantly. Drain on kitchen paper.

7. Transfer the hot chicken to serving plates and finish with chopped parsley, toasted nuts and a drizzle of olive oil.


I've blogged about sumac before as a Weekend Herb Blogging ingredient, so I'm going to pinch the content directly from my own post. Apologies to myself.

Commence!

Sumac is the name of all 250 species of flowering plants from the genus Rhus.

Also known as sumach, sumak, summak, tanner’s sumach, sommacco, zumaque and sammak, in this particular case sumac refers to the spice created from grinding the Rhus coriaria’s dried berries. This produces a tart, sour deep red-purple powder which is extremely popular in Arabic, Levant, Persian and Turkish cuisine.

Sumac berries form tight clusters of red drupes or bobs. They are harvested just before ripeness and sun dried. In growing regions you can buy whole dried berries whereas the rest of us need to make do with sumac powders. The powder keeps in an airtight container for several months.

The Rhus coriaria comes from the Mediterranean but sumac in general grows in subtropical and warm temperate regions throughout the world. It has been used in Mediterranean cooking since Ancient Rome and is a major souring agent in Middle Eastern cooking, replacing lemon juice, tamarind and vinegars.

There are numerous ways to employ sumac in your kitchen:
• on kebabs, fish or chicken before grilling
• popular in salad dressings, marinades, stews and casseroles
• enhances the flavour of fresh tomatoes and avocados
• mixed with yoghurt and fresh herbs as a dip or sauce
• dusted over feta or labneh cheese
• mixed with olive oil as a dip with bread
• common ingredient in za'atar (a spice mix)

North American sumac is also employed for culinary purposes. Native Americans used smooth sumac (Rhus glabra) and staghorn sumac (Rhus typhina) to make rhus juice, also known as sumac-ade or Indian lemonade. They would soak the sumac berry clusters in water to remove the essence then strain and sweeten the liquid.

Other North American sumac includes Rhus glabra, an excellent leather tanner which produces flexible, light weight and almost white leather products, and Rhus toxicodendron, also known as Poison Ivy.

Sumac is said to have diuretic effects and the assist bowel problems and fever. In the Middle East a sour drink is made from sumac to relieve indigestion.

And one last weird fact: dried sumac wood glows under UV lighting. Who would have thought!

That’s it for WHB for another week. Check out the recap with our host Janet from The Taste Space.

References & Photo Source:
http://en.wikipedia.org/wiki/Sumac
http://en.wikipedia.org/wiki/Image:SumacFruit.JPG
http://www.theepicentre.com/Spices/sumac.html
http://www.taste.com.au/how+to/articles/52/sumac

Friday, 27 August 2010

ispahan cupcakes


Tomorrow (Saturday) my dear friends, Kath and James, are getting married.

Parisian extraordinaire Pierre Hermé invented the ispahan flavour during his time at Ladurée and the lychee, rose and raspberry combination was named Ispahan for the gorgeous pink blush of a Damask rose.

So when Kath, the sweetest friend I know, was having her hen’s afternoon tea I just had to make these cupcakes for her and the girls.

They were a symbolic fit, given Kath had made rosewater cupcakes with me for my own engagement party. And suitably, Kath's hens night theme was Parisian Glamour as she and hubby-to-be were heading to Paris for the honeymoon.


Ispahan Cupcakes
Lychee & Rosewater Cupcakes
Recipe by My Tartlette. Makes 24 cupcakes.

Ingredients:

1½ cups self-rising flour
1 cup all-purpose flour
¼ cup ground almonds
250g unsalted butter, softened
2 cups caster sugar
4 large eggs, at room temperature
¾ cup milk
40ml rosewater (2 tablespoons)
24 lychees, stoned and chopped

Method:
1. Preheat oven to 180’C. Spray 24 cupcake liners with cooking spray and set them on a baking sheet.

2. In a small bowl, combine the flours and set aside.

3. In a large bowl, on the medium speed of an electric mixer, cream the butter until smooth.

4. Add the sugar gradually and beat until fluffy, about 3 minutes.

5. Add the eggs, one at a time, beating well after each addition.

6. Add the dry ingredients in three parts, alternating with the milk, lychees and rosewater. Do not overbeat.

7. Using a rubber spatula, scrape down the batter in the bowl to make sure the ingredients are well blended.

8. Carefully spoon the batter into the liners, leaving space at the top for the cupcakes to rise significantly.

9. Bake for 20–25 minutes, or until a cake tester inserted in the centre of the cupcake comes out clean. Cool completely before frosting.


Raspberry Buttercream Frosting
Based on a recipe by CookSister. Makes 1½ cups.

Ingredients:
100g butter, room temperature
1¼ cups icing sugar
¼ cup raspberries purée

Method:
1. Cream the butter, then add the icing sugar and cream together.

2. Add the puréed raspberries a little at a time until the right consistency is achieved.

3. Use a piping bag or a palette knife to ice the cakes.


Roses are my Weekend Herb Blogging theme ingredient this week, hosted by Astrid from Paulchen's Foodblog, a Viennese food diary.

Roses are a flowering shrub from the family Rosaceae, a group that also includes apples, cherries, peaches, pears, raspberries, strawberries and almonds.

Most of the roses we’re familiar with are Asian natives, with smaller groups hailing from Europe, North America and northwest Africa.

High in Vitamin C, rose petals, oils and waters never fell from favour in the food of the Middle East and Asia, and roses are now see a revival in European cooking too, where they were used lovingly from ancient times until as recently as the late 1800s.

I remember my mother was an avid rose gardener. She would lovingly tend to her roses all year long and relish the short, flowering season when the bushes would droop with the heavy petals and the garden was filled with their heady scent.

I remember, after my impossible request for a blue rose, my mother sourced the Blue Moon, a tea rose that would perfume my room with its adorable lilac blooms.

Rose have always represented love and beauty, perhaps because the flower is so delicate and sweet-smelling, but so short lived and balanced carefully on a dangerously prickly stem.

As my two friends tie the knot, I’m reminded of the poet-philosopher Kahlil Gibran whose words on roses are a pithy observation on relationships themselves:
“The optimist sees the rose and not its thorns; the pessimist stares at the thorns, oblivious to the rose.”


Tuesday, 17 August 2010

muhammara - syrian pepper spread


Traditionally muhammara is a Syrian spread made from sun-dried Aleppo peppers, ground walnuts and pomegranate molasses, as well as a variety of spices.

In Australia we can’t buy the sun-dried peppers so I used char-grilled peppers instead. Also, I believe the traditional recipe uses bulgur wheat, rather than the breadcrumbs I have used.

Muhammara is great as a dip or spread on bread and toast, like a Middle Eastern crostino or bruschetta.

Called Acuka in western Turkey, muhammara can also be served as a sauce for meat and fish.


Muhammara (Syrian Walnut & Red Pepper Dip)
 
Anna’s version of various internet recipes. Makes 2 cups.


Ingredients:
2 small red capsicums (peppers)
40g walnuts
20g pine nuts
20g pumpkin seeds
1 small onion, chopped finely
1/3 cup olive oil
¼ cup breadcrumbs
2 tablespoons lemon juice
1 teaspoon cumin seeds
1 teaspoon pomegranate molasses
1 teaspoon sumac
1 teaspoon sea salt
½ teaspoon Aleppo pepper

Method:

1. Using tongs, hold capsicum over gas flame until the skins are blackened. Quickly place in a plastic bag and seal. The steam will help loosen the skin.

2. When they’ve cooled, peel off blacken skin then slice and remove seeds. Cut into strips.

3. Dry roast nuts and pumpkin seeds in a frying pan until toasted and slightly golden.

4. Pulse nuts in a food processor with breadcrumbs until finely chopped.


5. Heat some of the olive oil in a frying pan, then sauté onion and cumin seeds until onion is softened.

6. Add onion to food processor with capsicum, sumac, Aleppo pepper, lemon juice, pomegranate molasses and sea salt. Blend until smooth.

7. With the motor running, slowly drizzle in the remaining olive oil until the dip loosens then thickens.

8. Serve with Lebanese or pita bread, garnished with pomegranate seeds.

Note: to save time you could purchase char-grilled capsicums (peppers). Muhammara keeps in a sealed container in the fridge for around 4 days.


This is my contribution to Weekend Herb Blogging, this week hosted by Marija from Palachinka, a beautiful Serbian blog.

I chose capsicums/peppers for my WHB ingredient because I have hated them as long as I can remember. I have continually tasted them throughout the years (probably once monthly) just hoping that suddenly I will have changed my mind.

But alas - despite their pretty shiny skins and regardless of their fresh, crispy rawness or sweet, soft char-grilled form - I just didn't like them.

Until this June.
Something miraculous happened and suddenly I can eat them!

Perhaps it was my recent overdose on pimientos de gernika and pimientos de padron when there were nought other vegetables to be found in Spanish restaurants?

Whatever it was, capsicum is starting to taste good.
And that's worth celebrating.

Wednesday, 11 August 2010

spiced cherry pie


My old man turned 65 last Saturday.

It’s kind of scary when your parents get older because by this stage you’ve grown out of your teenage rebellion and really appreciate them.

Suddenly your parent’s careful concern doesn’t seem so annoying.

Like the time your mother firmly refused to allow you, at age 13, to wear to school more eye-liner than a coal miner.
Or the time your father eyeballed you anxiously when you brought home one of his old school chums and introduced him as your new boyfriend.

Yes, parents do have a certain wisdom.

So now my Dad is 65, and for his birthday I baked him a cherry pie.
I used my pastry and filling recipe, with Chez Pim's addition of ginger, cloves and nutmeg.

This spiced cherry pie went very nicely with the amazing Sweet & Smoky Barbecued Pork Ribs that are my father's crowning culinary achievement.

Happy birthday Dad!


Cherry Pie

Anna’s recipe, influenced by Chez Pim. Serves 6-8 people.

Ingredients:
Filling

1kg sweet cherries
2 teaspoons cornflour
½ cup vanilla sugar
¾ teaspoon cinnamon
½ teaspoon ginger powder
¼ teaspoon nutmeg
Pinch of clove
2 tablespoons lemon juice

Pastry
350g chilled butter, chopped
3½ cups plain flour
4 tablespoons sugar
1½ teaspoons cinnamon
1 egg, lightly beaten
Sugar, for dusting

Method:

1. Preheat oven to 180°C. Grease pie dish.

2. Sift flour and pinch of salt. Rub in butter until crumbly. Add sugar. Add 2-4 tablespoons of water. Mix.

3. Gather dough. Divide into two balls. Flatten balls and roll into circles large enough to line pie dish. Put one circle in base of pie dish. Wrap and chill remaining circle.

4. In a pan combine the cherries, spices, sugar and lemon juice, and heat over a gentle flame.

5. Scoop out ¼ cup of the liquid that has gathered in the pot and mix with the cornflour until dissolved.

6. Add cornflour mixture to cherries and stir over low heat until the mixture boils and thickens. Remove from heat and set aside to cool.

7. Pour filling into pie dish, cover with remaining dough and cut edges with a knife to remove excess pastry from sides. Remember the pastry will shrink, so don’t cut off too much.

8. Roll out excess pastry and use cookie cutters to shape decorative cut-outs, using the beaten egg wash as glue. Glaze pastry with egg wash and sprinkle with sugar.

9. Prick or slice pastry to allow steam to escape during cooking. Bake for 40 minutes or until pastry is golden brown and crunchy.

Note: My pastry tears very easily and is very, very difficult to manoeuvre. The pay off for your patience is that it’s crunchy and delicious when you eat the pie.
Note: My original blueberry pie recipe used only half the pastry ingredients but upon making this for my cherry pie I didn't have enough pastry. The measurements you see above are the doubled version which I think will be much better and allow excess for decoration.
Note: You can make the filling and pastry the day before. I would refrigerate the base already fitted to the tin and the lid rolled out flat onto the plate. Bring everything to room temperature before pouring the cherries filling into the pie base and ensure your pastry lid is malleable to fit and seal. Bake as above.

Cherries are my theme for Weekend Herb Blogging this week and I've blogged the history and uses of these wonderful plump fruits before (check it out).

Check out all the recap and other WHB recipes from this week at Katie's Eat This!.


M&M's cherry recipes:
Cherrylicious (cocktail)
Duck w Cherries
Meggyleves (Hungarian sour cherry soup)
Schwarzwälderkirschtorte (German black forest cake)

From the M&M archives:
2009 -
Sahlap (Turkish orchid milk)

Monday, 2 August 2010

mango & coconut cake w kaffir frosting


Summer screams tropical flavours, and I know most of you have been enjoying a lovely summer.

Mango is a classic and you can’t pass up coconut.
Together in a cake? Fantastic!

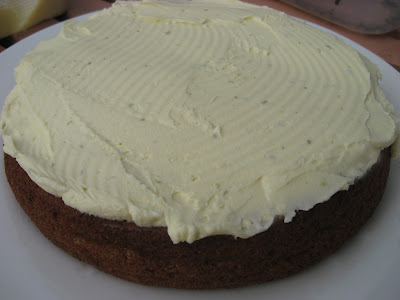
This recipe was delicious. The cake was beyond moist and almost fudgy, flavoured strongly with mango and a touch of coconut. It’s very sticky and crumbly, so bear in mind that it doesn’t keep its form once you start cutting into it.

I decided to top it with a cream cheese frosting, flavoured with lime juice and the zest of kaffir lime. The kaffir really stands out and pairs wonderfully with the mango and coconut in the cake.

It’s even good for the middle of winter when you’re missing the warm glow of summer.


Mango & Coconut Cake w Kaffir Cream Cheese Frosting
Based on a recipe from Konkan World. Serves 8-10.
Ingredients:
1 cup mango purée
¼ cup desiccated coconut
1 tablespoon lime juice
1 cup plain flour
1 teaspoon bicarbonate soda
½ teaspoon baking powder
Pinch of salt
½ cup (115g) softened butter
½ cup sugar
1 egg, beaten
¼ cup milk
¼ cup cream

Frosting
250g cream cheese
100g softened butter
1 cup icing sugar, sifted
Zest of 1 kaffir lime
Juice of 2 limes

Method:

1. Preheat oven to 180’C. Grease and line cake tin.

2. Combine the mango, coconut and lime juice. Allow to rest.

3. Sift the baking powder, bicarbonate soda, flour and salt together. Set aside.

4. Beat the sugar and butter together until light and fluffy. Add the egg and beat well.

5. Stir in the mango mixture.

6. Add the flour mixture, cream and milk alternately, starting and ending with the flour

7. Pour the mix into the greased cake tin and bake for about 40 mins or until the sides pull away from the tin and an inserted skewer comes out clean

8. Remove from oven, cool for 10 mins in the pan, then cool completely on wire-rack.

9. To make the frosting, combine all the ingredients in a bowl and beat with electric beaters. Spread over the cake and serve.

I’ve blogged about kaffir limes for Weekend Herb Blogging before (check it out) so I won’t write much about these wonderful, uniquely aromatic citrus fruits from the Malay/Indonesian peninsula.

Check out all the other WHB recipes at Lynne’s Café Lynnylu.

Tuesday, 6 July 2010

apple baby dutch


This fantastic breakfast recipe changed my opinion about cooked apples.

It’s hard to believe, but until I tasted this I’d never enjoyed cooked apples. Not apple pie, not baked apples, not apple crumble. No cooked apple.

But now I’m a changed woman.

Perhaps it’s because dutch babies are baked German pancakes introduced to the US by German immigrants to Pennsylvania, from whom I am a descended.


The strange thing about the Dutch Baby, and about the Pennsylvania Dutch in general is that they are actually Germans, confused by an English corruption of the German word deutsch.

In fact, it just occurred to me while writing this, that my brother and I are the very first generation not to be born in Pennsylvania in a direct line of descendants from a German immigrant who fought for his new country’s freedom in the American War of Independence.

Way to bring an end to some 250 years of tradition!

But back to those delicious apples, they are perfect atop this fluffy pancake that puffs up wonderfully in the oven.


Apple Dutch Baby
Adapted from a recipe on the Williams Sonoma website. Serves 4.
Ingredients:
Apple Topping
2 apples, peeled, cored & thinly sliced
1 tablespoon butter
1 teaspoon cinnamon
2 tablespoons brown sugar
Pancake
5 tablespoons butter, chopped
¾ cup all-purpose flour
3 eggs
¾ cup buttermilk
½ teaspoon salt
1 tablespoon sugar
Cream, for serving
Method:
1. Adjust the oven rack to the upper third of the oven. Turn on the oven to 200°C.
2. Put the butter in a very large (12-inch) skillet with an ovenproof handle.
3. Set in the oven for 5 minutes to melt the butter completely (okay if it begins to brown).
4. While the butter melts, measure the flour into a large bowl. Add the eggs, milk and salt. Beat until smooth, using a whisk, large spoon or handheld electric mixer.
5. Pour the batter into the hot pan. Return the pan to the oven and bake for 15 to 20 minutes, until the sides are puffed up and dark golden brown.
6. Meanwhile, to make topping, heat butter in a frying pan. Add apples, cinnamon and sugar and sauté for 8 minutes until softened. Set aside but keep warm.
7. Remove from the oven. Loosen the Dutch baby from the sides and bottom of the skillet, then slide it onto a serving plate.
8. Pile the fruit in the centre and sprinkle with powdered sugar.
9. To serve, cut into wedges and serve with thickened cream.
Note: original recipe used regular milk, was served with fresh fruit and maple syrup.


Apples are my theme ingredient for Weekend Herb Blogging.

Originating in Central Asia, the apple has more than 7,500 cultivars and is one of most widely cultivated tree fruits in the world. Heck, isn’t it the reason we’re all out here in the cold instead of kicking it back in the Garden of Eden?

Check out the WHB round-up from host Cinzia at Cindystar.

Tuesday, 29 June 2010

green goddess dip


After a month offline in Europe, it's time to start cooking again. It's been a while and I although I'll be blogging about the food we discovered for quite some time, I also plan to keep blogging recipes too.

It's winter back in Australia, but I'm still dreaming about the rays of sun I managed to catch in northern Spain.

This recipe captures the fresh flavours of summer well and is a great little dip to serve at a party or BBQ.

It tastes herby and fresh, and the saltiness from the anchovies leaves you wanting more.


Green Goddess Dip

Recipe from Williams-Sonoma. Makes 1½ cups.

Ingredients:
2 tablespoons roughly chopped fresh chives
2 tablespoons roughly chopped fresh flat-leaf parsley
2 tablespoons roughly chopped fresh basil
1 tablespoon roughly chopped fresh mint
2 or 3 anchovy fillets
1 shallot, roughly chopped
2 tablespoons fresh lemon juice
¼ cup mayonnaise
¾ cup sour cream
Chips and crudités, for serving
Method:
1. In a blender or food processor, combine the chives, parsley, basil, mint, anchovies, shallot, lemon juice and mayonnaise.
2. Blend or process until smooth, about 1 minute or about 15 pulses.
3. Transfer the mixture to a bowl and stir in the sour cream.
4. Cover with plastic wrap and refrigerate for at least 30 minutes or up to 3 days.
5. Serve with potato chips and crudités for dipping.

This is my contribution to Weekend Herb Blogging this week, hosted by Anh from Food Lover's Journey.


Related Posts with Thumbnails