Showing posts with label fruit. Show all posts

Saturday, 26 January 2013

pavlova, an australian favourite

Happy Australia Day!

Today is our national holiday, a time where most Australians throw a BBQ or catch up with friends and family in the summer warmth.

Since it’s Australia Day, the dessert that ends the festivities should be a pavlova, something named after a Russian ballerina but yet typically Australian.

Or is it?

While it’s true that Australia has very successfully exported pavlova around the world (and taken all the glory), what many of us don’t know is that culinary historians have proven the pavlova was actually invented in New Zealand!

The proof seems to be out there in the form of published recipes and articles, of which New Zealand has many earlier cases than Australia (NZ 1926 v AU 1929).

Knowing this I feel a little cheated, a slight loss of cultural identity, but imagine how the poor Kiwis feel about the fact that Aussies stole their tasty dessert and are unashamedly passing it off as our own!

It's not the first time we've done that, and no doubt it won't be the last.


Regardless of whoever invented it, these days both countries use it as a symbol of cultural identity and since it’s a pavlova there’s plenty to share with everyone.

On the topic of sharing, while I say this recipe serves 10 people (and it does), I have to confess me and three friends managed to polish off the entire thing in 30 minutes.

Prepare yourself for gluttony at its finest.


Pavlova

Anna’s very own recipe. Serves 10.

Ingredients:
5 eggwhites, at room temperature
330g (1½ cups) caster sugar
1 tablespoon cornflour
1 teaspoon white wine vinegar
1 vanilla bean, scraped seeds only (or 1 tsp vanilla extract)
300ml thickened cream, whipped
2 passionfruit, pulped
2 bananas, sliced and doused in lemon juice to prevent discolouring
1 punnet strawberries, halved
½ punnet blueberries

Method

1. Preheat the oven to 150’C.

2. In the bowl of an electric mixer, beat the egg whites on a high speed until fluffy, about a minute.

3. Reduce speed to slow then gradually add caster sugar until the mixture is thick and glossy with a hard peak.

4. Next beat in the cornflour, vinegar and vanilla.

5. Line a baking tray with baking paper and pour the meringue on. Stack high to get a marshmallow interior and thin for a crusty pavlova. Create a concave/nest in the centre to catch all the cream and fruit.

6. Bake the pavlova for 50 minutes until quite firm, then turn the oven off but leave the pavlova in it to cool completely.

7. Spread the cream over the meringue then decorate with fruit. Serve excess fruit on side platter to be passed separately for those who want extra.

Note: The mixing bowl should be clean with no grease in it, the egg whites at room temperature and there should be absolutely no yolk in the white.

Tuesday, 25 December 2012

jamie oliver’s “new” mince pies


Merry Christmas!!!

Today Jonas was up early cooking a variety of Swedish delicacies for our Julbord (Christmas table):
  • vörtbröd (wort or beer bread)
  • smoked sausages
  • smoked mackerel
  • sillsallad (pickled herring with mayo, egg, herbs & potato)
  • meatballs with lingon jam
  • beetroot salad
  • bourbon-maple-mustard glazed ham
  • Janssons frestelse (potato & anchovy gratin)

My only contribution was these mince pies.


I know have slowed down my blogging lately, but I promise I have a really good excuse.

I’m not quite ready to share the reason just yet but suffice to say, if all goes according to plan, I will let you in on the secret in March. Until then, please be patient and I promise I won’t disappear completely.


I saw Jamie make these pies on a Christmas TV special and thought they looked a lot simpler and easier to make than traditional mince pies. I fancied mine up quite a bit with dried sour cherries, blueberries and dates, but you could use any dried fruits you have on hand.

They are quite sweet and intensely flavoured, so I recommend serving with sweetened crème fraîche, ice cream, custard or cream to balance it out a little.


Jamie Oliver’s “New” Mince Pies

My adaptation of Jamie Oliver's recipe. Makes 12.

Ingredients:
¼ cup dried cranberries
¼ cup dried sour cherries
¼ cup dried dates, chopped
2 tablespoons dried blueberries
½ cup brandy
400g jar high quality fruit mince
30g glace orange rind, finely chopped
100g peeled, roasted chestnuts
2 sheets puff pastry
6 sheets of filo pastry
50g butter, melted
1 teaspoon cinnamon
1 egg, beaten
¼ cup flaked almonds
Icing sugar, to dust

Method:

1. The day before, combine the dried cranberries, sour cherries, dates, blueberries and brandy in a plastic container. Mix and seal overnight.

2. Preheat the oven to 200°C/400°F/gas 6. Butter a muffin tray (for 12 muffins).

3. Spread the mincemeat over the two puff pastry sheets. Sprinkle over dried fruit mixture, glace rind and then crumble over chestnuts.

4. Tightly roll up the pastry, lengthways, like a Swiss roll, place it on a floured tray, and pop in the fridge to firm up.

5. Combine the melted butter and cinnamon.

6. On a flat surface, butter one layer of filo pastry. Top with another sheet and butter. Fold them in half to create a long thin strip then place over four holes of the muffin tray. Repeat two more times, covering all the muffin holes. Brush all with butter.

7. Take the puff pastry rolls out of the fridge and, with a sharp knife, cut each into 6 slices. Place each slice into a filo-lined hole, flat-side down so the spiral of fruit is displayed.

8. Brush with the egg and sprinkle a few flaked almonds on top of each little pie, then pop both trays in the oven for about 25 minutes, until cooked and golden brown.

9. Leave to cool, then crack the individual pies out of the trays. Dust with a little icing sugar before serving.

Note: You can freeze the cooked, cooled mince pies in their trays (just wrap the lot in cling film). Just reheat them in a hot oven straight from the freezer.


Sunday, 15 July 2012

pounti: auvergne pork & prune meatloaf


Some time ago I read about “pounti” or “picoücel” a special pork, prune and bacon cake from the Auvergne region of France. It uses the famous prunes of the region and is served either cold or fried in slabs.

Ever since I read about this pork cake, I dreamt of coming up with my own meatloaf inspired by those flavours, and in fact made it one of my 2012 Food Challenges to come up with a meatloaf recipe.


Ta daaaa!

The results were pleasing. The prunes and sage matched perfectly with the sweet-salty pork meat.

It’s quite a rich meal, so I recommend serving with a refreshing side, such as watercress dressed in olive oil and lemon juice.


Auvergne Pork & Prune Meatloaf (Pounti)

Anna’s very own recipe. Serves 4.

Ingredients:
5 rashers bacon, finely diced
1 onion, finely diced
5 garlic cloves, crushed
500g pork mince
1 cup fresh breadcrumbs (see notes)
200g prunes, pitted & halved
2 tablespoons sage, finely chopped
1 egg, beaten lightly

Method:

1. Preheat the oven to 180’C.

2. Cook the bacon in a dry frying pan until crispy. Set aside to cool.

3. Using the fat from the bacon, sauté the onion, garlic and sage until soft. Set aside to cool.

4. In a bowl, combine all the ingredients together by hand, using your fingers to knead the mixture together into a meat dough.

5. Place in a baking loaf and bake in the oven for around 1 hour or until the meat is cooked through the juices run clear.

6. Remove from oven and allow it to rest for 10-15 minutes before cutting in and eating.

Note: put one torn, fresh bread roll in a food processor and blitz until it turns into fluffy crumbs. Don’t process for too long or the heat of the machine may make the bread damp.

Friday, 6 July 2012

brown sugar meringue w verjuice figs & honey-cinnamon yoghurt


These are divine. The outside are perfectly crisp and break with a pop under your fork, yet the inside is a fluffy, sticky, gooey texture almost like a melted marshmallow.

And the flavour! You can certainly taste those perfect burnt, dark toffee sugars.


I first tried brown sugar meringues at a wonderful slow food wine dinner at Mumu Grill in Crows Nest, and although I have yet to venture across the Harbour Bridge to the far northern shores of Sydney, to dine at this restaurant again, the wonderful meal is branded into my food memory, especially the “brown sugar pavlova”.

This is one of my 2012 Food Challenges, to recreate recipes I had experienced at restaurants and boy does this recipe tick all the boxes.

It was a while ago since I ate the Mumu Grill version, but accompanied with the verjuice figs and the sourness of yoghurt, I might even bravely claim that my version is better.


Brown Sugar Meringue w Verjuice Figs & Honey-Cinnamon Yoghurt

Anna’s very own recipe. Serves 6.

Ingredients:
3 egg whites, at room temperature
100g dark brown sugar
50g caster sugar
Pinch of Tahitian vanilla salt
½ cup pomegranate seeds
125ml thick low fat Greek yoghurt
1 tablespoon honey
½ teaspoon cinnamon
18 dried figs
⅓ cup verjuice
⅓ cup caster sugar, extra

Method:

1. Preheat the oven to 120°C.

2. In a mixing bowl, beat the egg whites until soft peaks form.

3. In another bowl, combine the sugars and salt and stir thoroughly.

4. Beat in the sugar mixture in 1 tablespoon batches, making sure each amount is incorporated before adding more.

5. Beat until the meringue is thick and glossy, holding its shape (peaks).

6. Spoon meringue into six small mounds, leaving space for them to spread and using spoon to create peaked tops.

7. Bake in the centre of the oven for 60 minutes, then prop open oven door slightly and leave to cool for one hour before removing. Cool one more hour before serving.

8. Meanwhile, prepare the figs by heating the verjuice and ⅓ cup caster sugar until boiling. Add figs then bring to the boil and cook for another 3 minutes. Remove from heat and allow figs to cool in syrup.

9. Make the yoghurt by mixing with the honey and cinnamon, then return it to the fridge.

10. To prepare the dish, take a meringue then dollop the honey-cinnamon yoghurt around it. Top with figs and pomegranate seeds.

Sunday, 1 July 2012

smoked apple & chestnut ravioli w cinnamon apple butter


Back in 2007, a few days after our wedding, Jonas and I visited Rockpool, back in it's original iteration when it was one of Sydney's finest, and ordered their extensive degustation menu with premium matching wines. It still stands as the most expensive meal of my entire life, and with the same money we could have bought an overseas airfare and possibly accommodation. Don’t ask, suffice to say it was expensive.

But the memory was also priceless, as it was our wedding gift to each other and many of the dishes we ate on that evening have remained with us.

One in particular was an apple and chestnut ravioli, a dish served to Jonas in his vegetarian days. It was a confusion of sweet and savoury apple and cinnamon and herbs. A clever combination that was executed perfectly.

This year, as one of my 2012 Food Challenges, I decided I needed to recreate recipes I had experienced at restaurants. This was one of them, but I decided to put my own twist on it by using smoked apples, that I hot smoked myself in my Nipper Kipper smoker.


While it was a somewhat complicated recipe (a lot of steps to go through), I feel really rewarded for my efforts.

It was a very elegant dish and would be a big hit at a swanky dinner party.

Unfortunately for me, every shop I visited was out of wonton wrappers so when I finely found some they were square rather than round. Please go with the round versions, they will be much prettier.

And be sure to top your dishes with fresh herbs. They really cut through the intensity of the rich glaze sauce.

I used butter and chicken stock, but you could easily make this a vegetarian version with veggie stock or a vegan version with olive oil instead of butter and go with non-egg-based pasta.

Any leftover ravioli filling can be set in the fridge and eaten as a vegetarian paté.


Smoked Apple & Chestnut Ravioli w Cinnamon Apple Butter

Anna’s very own recipe. Serves 4.

Ingredients:

Smoked apples
2 green apples
Smoker
Wood chips

Ravioli
32 round egg wonton wrappers (for 16 ravioli)
2 tablespoons chopped sage
1 tablespoon butter
1 teaspoon smoked salt
½ white onion, chopped
1 garlic clove, chopped
1 teaspoon freshly milled black pepper
1½ smoked apple, chopped
100g chestnut purée
Butter for frying
Beaten egg, for sealing wonton wrappers

Butter Sauce
50g butter
1 teaspoon onion powder
½ teaspoon ground cinnamon
¼ cup verjuice
Sprig of lemon thyme, picked over
½ smoked apple, chopped
½ cup chicken consommé
¼ cup boiling water
1 teaspoon sugar
Black pepper
Salt
Fresh sage leaves, small and picked over

Method:

For the smoked apples

1. I peeled mine but left the core in.

2. Then I sprinkled about a tablespoon of dampened apple wood dust over some aluminium foil, placed my rack above it, then placed the two apples in and shut the top.

3. With the mentholated spirits lit, I removed the apples after about 20 minutes. This was probably about 5-10 minutes of heating up and 5-10 minutes of pure smoking.

4. When I removed them, they were warm, still fairly white and the outside was mildly soft but the inside was still hard.

5. I didn’t want to cook them any more than this as the smoke flavour would become overwhelming and somewhat acrid, ruining the balance of the dish.

6. Core each apple and chop into cubes: 1½ apples will go into the ravioli and ½ an apple will go into the sauce.


For the sauce

1. In a pan, heat the butter, onion powder, ground cinnamon, black pepper and salt until butter starts to brown and bubble.

2. Add verjuice and lemon thyme and bring to the boil.

3. Add apple, sugar, chicken consommé and boiling water, then bring to the boil and reduce for 5 minutes.

4. The sauce is done when the apple is soft and the liquid has reduced to a dark brown glaze (about ½ cup).

5. Keep warm while you cook the ravioli.


For the ravioli

1. Using a little butter, sauté onion and garlic until soft. Set aside.

2. Heating a little extra butter, add the sage leaves and heat until almost crispy. Set aside.

3. Using the sage-scented butter, add the chopped apples, smoked salt and pepper and fry until the apple is browned and soft.

4. Put the chestnut purée, cooked apple, onion and sage into the food processor and blend into a purée.

5. Line a tray or plastic container with baking paper, for the ravioli.

6. Lay wonton wrappers out on flat surface and brush with beaten egg (egg wash).

7. Put small dollops of purée on half the wrappers, then top them with the remaining wrappers, being sure the gently press out any air pockets when sealing them.

8. Lay the finished ravioli on the baking tray, with paper baking between layers to prevent sticking. Refrigerate for 5 minutes (to firm) or until ready to cook.

9. Bring a pot of salted water to the boil, then simmer ravioli until it rises to the surface and the pasta is cooked through.

10. Drain onto paper towels then plate, drizzling with sauce and apples, sage and thyme leaves.


Sunday, 24 June 2012

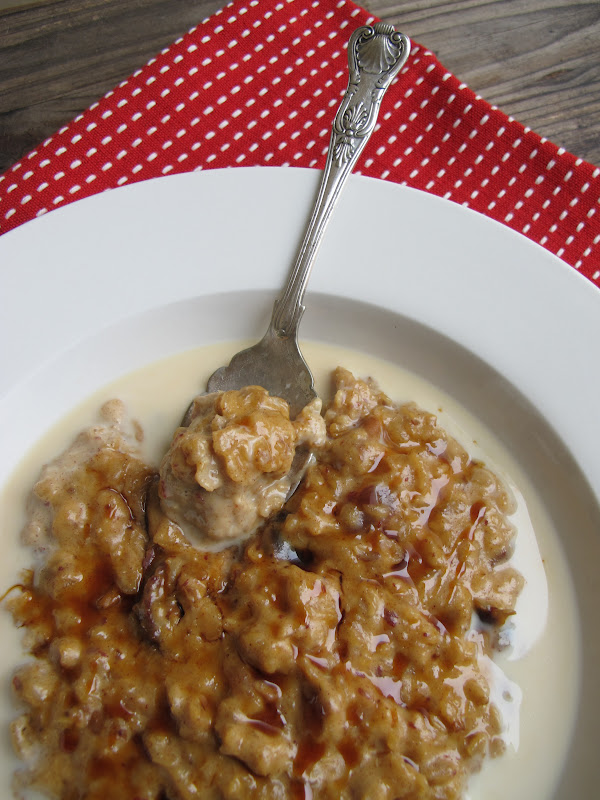
creamy date, oat & quinoa porridge


It’s a wintery Sunday morning, your breath fogging the air above the bed and frost blanketing the window panes. All you want to do is stay in bed, and so you do!

Once you’re up, attired in woolly socks and pajamas that have seen better days, you make your sleepy way into the kitchen for a warm, hearty bowl of porridge.


But why eat plain old oats when you can break your fast on an indulgent combination of cream, chopped dates, luscious date syrup and Tahitian vanilla salt. All brought together with a healthy dose of quinoa flakes.

The result is luxurious and enough to tempt you out of bed, even on the coldest mornings.


Creamy Date, Oat & Quinoa Porridge

Anna’s very own recipe. Serves 3-4.

Ingredients:
1 cup rolled oats
¼ cup quinoa flakes
2 cups milk
½ cup pouring cream
½ cup water
1 teaspoon Tahitian vanilla salt
½ teaspoon ground cinnamon
15 pitted dates, chopped
1 tablespoon date syrup (or brown sugar)
Extra date syrup, to serve (optional)
Extra warmed milk, to serve (optional)

Method:

1. Combine milk, cream, oats, dates, date syrup, cinnamon and salt in a saucepan over a medium heat.

2. Bring just to the boil, then cook, stirring continuously, until mixture is thick and creamy.

3. Drizzle with extra date syrup and top with warm milk to serve.

Monday, 7 May 2012

prickly pear & lime curd


from sour to sweet

Australia has a sour history with the prickly pear plant.

The very first settlers, on the First Fleet, brought it with them to establish a cochineal industry (the tiny cochineal grubs that live in the plant are squashed to produce red dye). Since Britain required a lot of red dye for their textile industry (not to mention the Red Coats of their army), they hoped an Australian colony would break the cochineal monopoly held by Spain and Portugal.

Instead, the prickly pear became one of the most invasive weeds ever introduced to Australia.

Last week I wrote about eating the prickly pear cactus paddles, but their fruits are also very popular in Mexico (where it is known as tuna) and southern Italy (where it’s called fico d'India or Indian fig). They are eaten fresh or in drinks, jams, ice creams and salsas.

There are many kinds of fruit as well, ranging from ultra sweet to tart.

1. The Juana (sometimes called roja) has large, chewy seeds and tart, crimson flesh. 2. The roja pelona, kiwilike in flavor, is free of thorns, and while the seeds of all tunas are edible, the ones in this variety are smaller than most. 3. The widely available cristalina, also known as zarca, is juicy and crisp, with a sweet flavor like that of a white peach. 4. The naranjona has a honey-sweet, subtly spicy flavor reminiscent of a ripe persimmon's. 5. The wild xoconostle has a sour and chewy, edible peel that is sometimes used in savory stews. 6. The most widely available wild variety, the cardona has soft seeds and a flavor that's both sweet and bitter, almost like a Luxardo cherry's. 7. The cuerno de venado has a floral flavor; its high water content and small seed size make it a favorite snacking tuna. 8. The yellow platanera has a tropical flavor like that of bananas, the fruit from which it takes its name. www.saveur.com

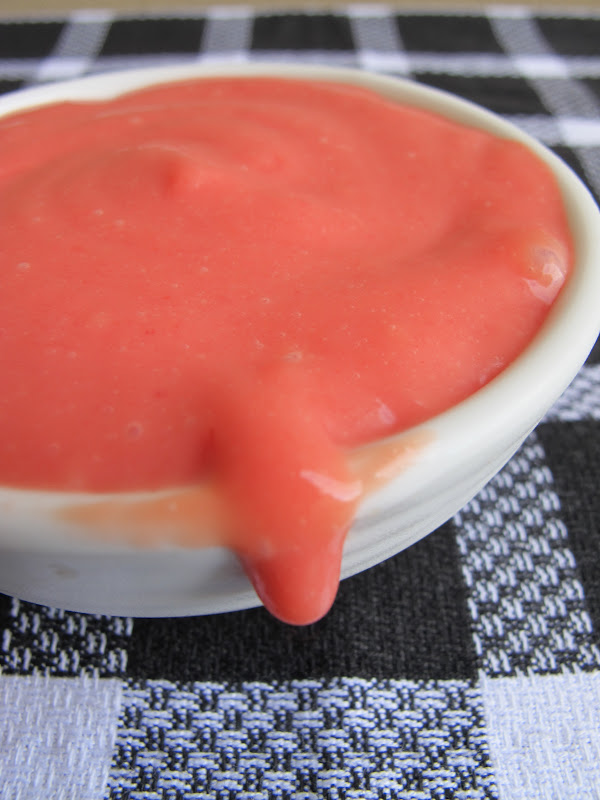
The prickly pears I was given by my colleague had vibrant red flesh, so I went for something sweet that exposed the beautiful crimson juices.

Dolloped upon perfect lime-scented meringues, this curd was a rather delectable treat.


Prickly Pear & Lime Curd

Anna’s very own recipe. Makes approx 250ml (1 cup).

Ingredients:
40ml lime juice (2 tablespoons or 1 lime)
60ml prickly pear juice (¼ cup or 1-2 prickly pears)
30g sugar
3 egg yolks
75g butter, chopped into pieces

Method:

1. To peel the prickly pears, use gloves and cut one end off, stick the top with a fork then with a very sharp knife make a cut lengthwise down the fruit to peel the outer layer off. Cut base off then discard peel.

2. Place the fruit in a food processor and puree. Strain through fine mesh using the back of a spoon to push pulp through and separate seeds.

3. Transfer to a heatproof bowl then add egg yolks, sugar and butter. Whisk to combine.

4. Stir continuously over a saucepan of simmering water until mixture has thickened and coats the back of a wooden spoon (3-5 minutes).

5. Remove from heat then set aside to thicken for an hour or two. Cover and store in refrigerator up to three days.

Note: Can also be kept for a month or two in the freezer and defrosted.


So how did it the prickly pear spread across the countryside?

In the mid-1800s, gardeners foolishly planted the cactus in paddocks and parks all along the east coast, mistakenly believing it would make great stock fodder or hedge plants. It flourished in the arid Australia climate and move from garden to paddock where it exploded across the country.

The impact was devastating and it took Special Acts of Parliament in the 1920s for coordinated and serious action to be undertaken. By that time some 60 million acres (25,000,000 hectares) of Queensland and New South Wales were overtaken and 40,000 km2 (15,000 sq mi) of farming land was rendered completely unproductive, with families unable to move between the plants and forced off their land.

The saviour in this story came in the form of the Cactoblastis cactorum, a dusty brown South American moth that, in a case often cited as one of the world’s most successful biological pest control, almost wiped out the Australian infestation of prickly pear.

But what of the cactus today?

From one of the most invasive weeds ever introduced to the country, it’s now on the supermarket shelves next to exotic pitaya, fragrant feijoa and vibrant rambutans. Curious customers are oblivious to its history as a noxious weed.

This is my contribution to Weekend Herb Blogging, hosted this week by Cinzia from Cindystar.

Wednesday, 18 April 2012

passionfruit slice


This recipe made me swoon.

I had never made passionfruit slice before, but it’s an Aussie favourite. Rightly so, given all the backyard passionfruit vines. Passionfruit will grow out of control if you don’t keep a close eye on it, but I couldn’t care less given the amazing fruits it yields.

My favourite types of passionfruits are panamas. They are much bigger, yield more pulp which is a vibrant golden hue and ultra fragrant, and they also seem to contain less white fibres to battle with when extracting the pulp.

Purple passionfruits are prettier though, and still damn tasty. These are the ones I ate the most growing up, as two different homes I lived in had purple vines in the back yard. In fact at one house the vine was right next to the pool so all you had to do was hop out of the water, rip one off the vine, jam your stubby finger inside and suck out the pulp as you jumped back into the pool. Kids, eh.


These Aussie childhood memories are fitting for the recipe I made after receiving a basket of passionfruits from the Passionfruit Industry of Australia.

Passionfruit slice: a simple biscuit base smothered in a tangy, fudgy topping.

The base is pretty standard in every recipe you'll come across, but I decided to add a little vanilla to enhance the flavours. And for the topping, I doubled the usual passionfruit quantities to ensure you’re hit with the intense flavours you’d expect from any passionfruit dessert.

Jonas thinks it’s one of the best cakes he’s ever eaten. Even better than my Easter egg friands, which he loved.

SK from my office told me it was one of the best cakes she’d eaten in a very long time, and when my colleagues swooped back for seconds it confirmed the ooohhs and aaaaahs were not just politeness.

If Jonas has his way, I’ll be making this recipe again and again and again and again.

And again and again.


Passionfruit Slice

Anna’s version of an Aussie classic. Makes approx 30 squares.

Ingredients:
100g (½ cup) caster sugar
85g (1 cup) desiccated coconut
150g (1 cup) self-raising flour
125g melted butter
¼ teaspoon vanilla bean paste
395g can sweetened condensed milk
250g passionfruit pulp (about 12 passionfruit)*
62ml (¼ cup) fresh lemon juice (1 lemon)

Method:

1. Preheat oven to 180’C / 350’F (or 160’C / 320’F fan forced). Grease a slice tin and line with baking paper.

2. *First prepare the passionfruit by scooping out the pulp of all but one passionfruit. Blitz in a food processor or blender to release the pulp from seeds, then strain through a fine strainer to yield juice. Mix in the pulp and seeds of the last remaining passionfruit (now weigh it to see you’ve got around 200-250g).

3. In a bowl, mix together the sugar, flour, coconut, vanilla bean paste and melted butter to form a dough.

4. Press mixture firmly into the prepared slice tin, to create a “cookie” base.

5. Bake for 10-15 minutes, until lightly golden on edges. Allow to cool.

6. In another bowl, mix together the passionfruit pulp, vanilla essence, lemon juice and condensed milk, as well as the additional passionfruit pulp.

7. Pour over cooled base then bake for another 10-15 minutes, or until just firm.

8. Bring to room temperature, then cover and refrigerate until completely set.

9. Cut into squares for serving. Store in an airtight container in the fridge.


Sunday, 1 April 2012

quince crumble tartlets


This morning I awoke to the new time. An extra hour to sleep in, but one less hour of sunshine.

It’s Autumn, my favourite time of year.

While most of my readers in the northern hemisphere are anticipating the warm weather that’s on its way, I’m getting equally excited about autumn.

The leaves turning beautiful shades of amber, ochre and crimson. The chill in the air that gives you the excuse to wear ribbed tights and wool scarves. The wonderful harvest fruits and vegetables that inspire a change of cooking in the kitchen.

Quinces are one of those harvest foods. Their pretty yellow skins and fragrant aromas reminding you that cool weather is on the way. Beautiful.


And another cold weather treat is warm desserts. I adore warm desserts.

Jonas is happy with a scoop of ice cream, but my favourite desserts are always warm.

This is the perfect autumn warm dessert using aromatic roasted quinces, prepared as individual fluted tartlets with crunchy crumble tops.

Eat warm, with lashings of vanilla custard.


Quince Crumble Tartlets

Anna's very own recipe. Makes 8 tartlets.

Ingredients:

1 batch of shortcrust pastry (or use frozen)

Quince
3 quinces
1 cup sugar
2 cinnamon (or cassia) quills
1 vanilla bean, split

Custard
1 cup cream
1 cup buttermilk
1 vanilla bean, split
3 eggs
½ cup brown sugar

Crumble
½ cup ground almonds
½ cup wholemeal flour, sifted
65g cold salted butter
1 teaspoon ground cinnamon
¼ cup Demerara sugar

Method:

Bake quinces
1. Preheat oven to 180’C.

2. Peel and core quinces, reserving scraps. Cut each quince into eight pieces..

3. Scatter quince scraps along the base of a baking dish, place segments on top.

4. Nestle cinnamon quills and vanilla between pieces, then scatter with sugar.

5. Top with 1 cup water, then bake in oven until soft (about 1 hour). Allow to cool.

6. Slice quince into thin pieces so you can layer them into tarts when ready.

Prepare tart shells
7. Ensure oven is still at 180’C. Grease and line 8 tart cases.

8. Roll out pastry and place into tart cases. Prick with fork, line with paper then fill with baking weights.

9. Bake in oven for 10 minutes, then remove baking paper and weights and bake another 7 minutes.

Make custard
10. Bring the vanilla bean and cream almost to the boil over a medium heat.

11. Meanwhile, whisk eggs and sugar in a bowl.

12. Remove vanilla from cream and pour over egg mixture in a steady stream, whisking constantly to prevent eggs from scrambling.

13. Return the remaining custard to a sauce pan and over a medium heat, stir until it has thickened.

Make crumble
14. Chop butter into small cubes.

15. Combine all the ingredients in a bowl then rub the butter pieces into the flour with your finger tips until the mixture resembles crumbs.

Assemble
16. Line quince slices in the base of the pastry shells, then gently pour custard over quince slices until it reaches the top of the pastry case.

17. Top with crumble mixture, then bake in over for 40 minutes or until crumble is browned.

18. Cool slightly. Serve with warm custard.

Monday, 12 March 2012

achacha thirst quencher


I’m off to Singapore this afternoon for a week of networking, pitching and purveying sites.

I’ve never been to Singapore before. I’ve been through Singapore, but never stepped off the plane to take a look around.

Everyone keeps telling me it’s hot. Hot and steamy and sweaty. Not the most conducive weather for maintaining a polished, corporate look.

In anticipation of the heat, here’s a lovely little thirst quencher I prepared using the skins of the unusual achacha fruit.

Achachas (achachairú) are tropical fruit from the Bolivian Amazon, and they are delicious.

The bright orange skins are so pretty, but when you puncture them with your fingers and peel back the thick skins you’ll find soft, white flesh that tastes like a creamy, tropical combination of custard apples, lemon, pineapple and banana.

They taste amazing.

After you devour a bag of achacha fruit, don’t throw the skins away! You can infuse them with water and sugar to make a refreshing summer juice.


Chicha de Achachairú

Recipe from www.achacha.com.au Makes 1 litre.

Ingredients:
6-8 skins
1 litre water
1 cup caster sugar
1 cup water (extra)

Method:

1. Wash achacha skins. Blend with 1 litre water.

2. Leave for at least 24 hours (or longer) in the fridge.

3. Make sugar syrup by bringing sugar and the extra 1 cup water to a simmer for 5 minutes. Cool.

4. Strain skins through a mesh strainer. Discard skins and add sugar syrup to remaining juice.

5. Chill and drink.

Monday, 30 January 2012

peach cobbler


Baking fruit in pies and crumbles is a wonderful way to serve deliciously ripe yet bruised and marred summer fruits.

So what about the Cobbler?

Cobblers originated in the American colonies when English settlers wanted their traditional, homely pies but needed to be more economical with precious ingredients like butter, suet and flour. Ingeniously they invented the cobbler: a pie without a dough base yet still yielding that pleasurable experience of breaking through flaky pie crust into the stewed fruit or meat treasures beneath.

Pondering this history, Washington Post food writer, Kim O'Donnel, suggested since the apple pie is English and the cobbler is American, perhaps the saying ought to be changed to “American as cobbler”.


The earliest written reference to a cobbler comes from 1839 in The Kentucky Housewife by Lettice Bryan:
“A Peach pot pie, or cobler, as it is often termed, should be made of clingstone peaches, that are very ripe, and then pared and sliced from the stones. Prepare a pot or oven with paste, as directed for the apple pot-pie, put in the prepared peaches, sprinkle on a large handful of brown sugar, pour in plenty of water to cook the peaches without burning them, though there should be but very little liquor or syrup when the pie is done. Put a paste over the top, and bake it with moderate heat, raising the lid occasionally, to see how it is baking. When the crust is brown, and the peaches very soft, invert the crust on a large dish, put the peaches evenly on, and grate loaf sugar thickly over it. Eat it warm or cold. Although it is not a fashionable pie for company, it is very excellent for family use, with cold sweet milk."

It’s fascinating to think they inverted the dish after cooking and served it with the pastry on the base. No wonder they thought the messy end result wasn’t fit for company!

It’s thought that the decorative placing of the crust into biscuit or dumpling shapes reminded people of either cobblestones or small cob loaves (which in turn were named for the cobblestones they themselves resembled). In fact, a cobbler’s rippled surface does look somewhat like a cobblestone street.


A thousand variations on the baseless pie exist across the US including the Crisp, Crumble, Betty, Grunt, Pandowdy, Slump, Buckle and Sonker.

Crisps and Crumbles have oatmeal in their tops; Grunts and Slumps are iron skillet stove-top cobblers from New England; Buckles combine the fruit with a yellow cake-like batter and bake them together; Pandowdies have their crust broken and stirred through the filling during baking; Sonkers are deep dish cobblers from North Carolina; and Brown Betties are layers of fruit and buttered breadcrumbs baked into a bread pudding consistency.

It is traditional that cobblers from the Deep South are made of single fruits, most popular being and blackberry, blueberry and peach, served with a scoop of vanilla ice cream.

Since peaches are synonymous with the American Deep South, it’s only fitting I fill this cobbler with slices of fresh, yellow peaches. You could peel them if you like, but once cooked the skin looses its horrid fuzziness and flushes the peach flesh with pretty pink hues. Given it’s easier, I recommend keeping them on.


Peach Cobbler

Anna's very own recipe. Serves 8.

Ingredients:

Filling
1kg ripe juicy peaches, washed
¼ cup caster sugar
¼ cup water
¼ teaspoon cinnamon
1 tablespoon corn flour

Topping
150g (1 cup) self-raising flour*
30g brown sugar
1 teaspoon ground cinnamon
60g butter, coarsely chopped
½ teaspoon sea salt flakes
½ cup buttermilk, heavy cream or natural yoghurt
Milk, for brushing
½ teaspoon ground cinnamon, for dusting
1 tablespoon Demerara sugar, for dusting

Method:

1. Preheat oven to 190’C.

2. To make filling: cut each peach into eight slices and discard stones.

3. In a large pot, combine peaches, water and cinnamon then cover and simmer until peaches leach juices and start to bubble.

4. Add caster sugar, stir to combine then cover and simmer 3-5 minutes. Taste to ensure mixture is sweet enough. Add more sugar if needed.

5. Using a ladle, transfer a small amount of liquid to a bowl. Add cornflour and combine well.

6. Return cornflour liquid to peaches and stir through for a minute, then remove peaches from heat.

7. Pour peaches into an oven-proof baking dish. Spread evenly along base.

8. To make topping: process flour, brown sugar, cinnamon, butter and sea salt in a food processor until combined.

9. Add buttermilk, heavy cream or natural yoghurt (whichever you use) and process in short bursts until a dough forms.

10. Lightly flour hands and surface, then turn out dough and flatten.

11. Cut out shapes and place over peaches, overlapping.

12. Brush tops with milk, then sprinkle with cinnamon and Demerara sugar.

13. Bake for around 35 minutes or until has risen and turned golden.

Serve with good quality vanilla ice cream or heavy cream.

*Note: use wholemeal flour for extra depth of flavour.

Related Posts with Thumbnails